

DIY and Crafts
Fairy Tale Crafts and Activities For Kids – Game Ideas

What are fairy tales? These are the European genres that are described shortly. There are so many fairy tales that we have listened to, like Rapunzel’s story. Cinderella, mermaid, etc. Every child likes fairy tales! They fell deep while listening to the tales and started thinking about their imagination.
So, to get the fairy tale imagination in real life, we will make some crafts related to it. Here we are going to make some different crafts and games for kids related to fairy tales and their imagination. We can play games after making these crafts and enjoy!
So for these, you will need some guidance and materials. Take the help of your parents and start making them. Here we are providing you with the easiest help to make these crafts. See them, make them, and enjoy!
Fairy Tale Crafts Activities For Kids – Game Ideas
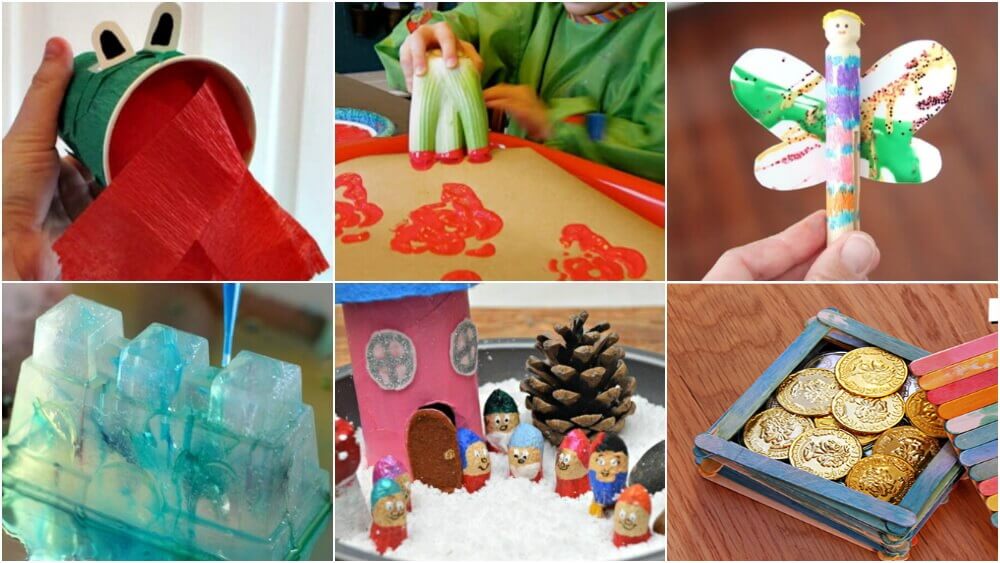
1. Beast’s Flowers By Celery Cut

Image Source/Tutorial: Joyfully Weary
Have you listened to Beast’s rose story? Yes! This is a craft related to that story for you. You will enjoy making this interesting craft! So let’s start! See the procedures given below.
Materials Required:
- Celery cut
- Paint
- Cardboard sheet
- Sprinkle or glitter
Procedure:
- Take the cardboard and the celery cut. Dip the celery cut in paint and mark the prints on the cardboard sheet. These are your flower prints.
- Take the sprinkles or glitter and spread them on the flowers.
- Let them dry.
- Decorate it on your table or home wall.
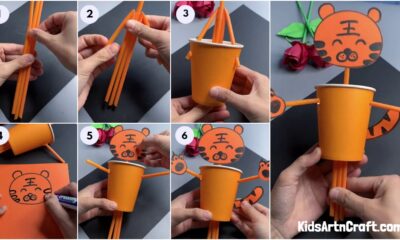
2. Dragon Mouth Craft
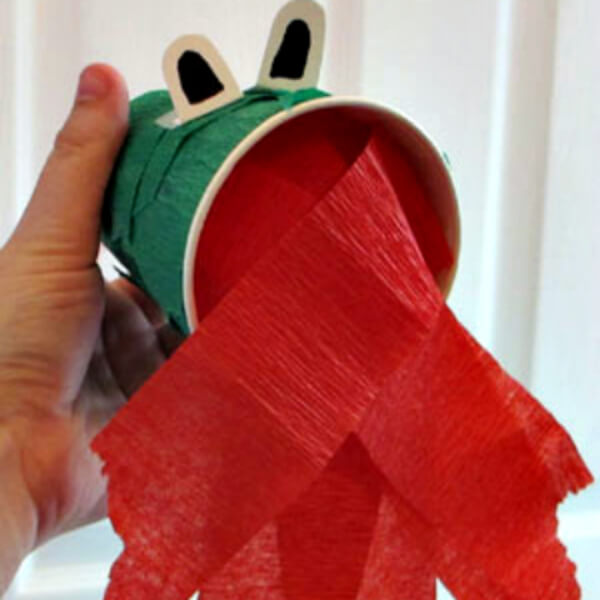
Image Source/Tutorial: All Kids Network
In fairy tales, we have listened to many things about dragons. Now it’s your turn to make a craft of a dragon. It is an interesting craft in which we make the face of the dragon in simple and easy ways.
Materials Required:
- Paper cup
- Green and red streamers
- Dragon eyes
- Glue
- Scissor
- Black marker
Procedure:
- Make a hole at the bottom of the cup.
- Cut red streamers and tape them inside the cup.
- Tape the streamers around the rim to give the best effect.
- Cover the outer part of the cup with a green streamer by gluing it.
- Cut out the eye template and glue it on the upper side of the cup.
- Blow in the hole at the back of the cup, and the streamers get to fly.
Kids will enjoy this game!
3. Storybox Craft
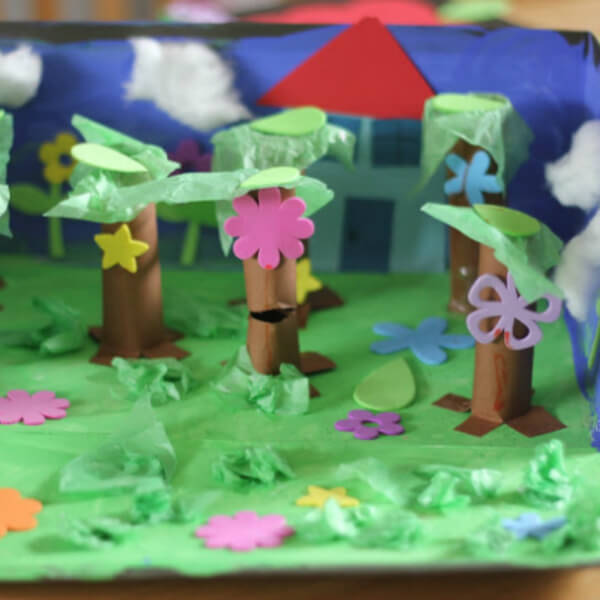
Image Source/Tutorial: The Imagination Tree
You can make a story box by collecting an old box. You can use a shoebox to make this craft. Show your skills and create an imaginary story. Start by looking at the given procedure.
Materials Required:
- A shoebox
- Paint colors
- Glittery foam stickers
- Cardboard tubes
- Cotton
- Glue
- Scissor
- Green tissue paper
Procedure:
- Take the shoebox and cut out its front and the upper portion.
- Now paint the scenery on the box. For this, first paint the base with green color. Then paint the sky.
- Take the cardboard tubes and glue them to the base of the box to make the trees.
- Now, take the green toilet paper and cut out the shapes of leaves to cover the trunks.
- Use foam stickers of flowers to decorate the trees.
- Use colored papers to cut out the shapes for home. Use a red sheet to make a triangle for the roof of the hut, and use the grey sheet to cut out a square for the home. Glue your home.
- Use cotton to make the clouds. Glue them on the sky portion.
Your beautiful scenery is ready! Show your craft to your family members.
4. Fairy Dust Game Craft
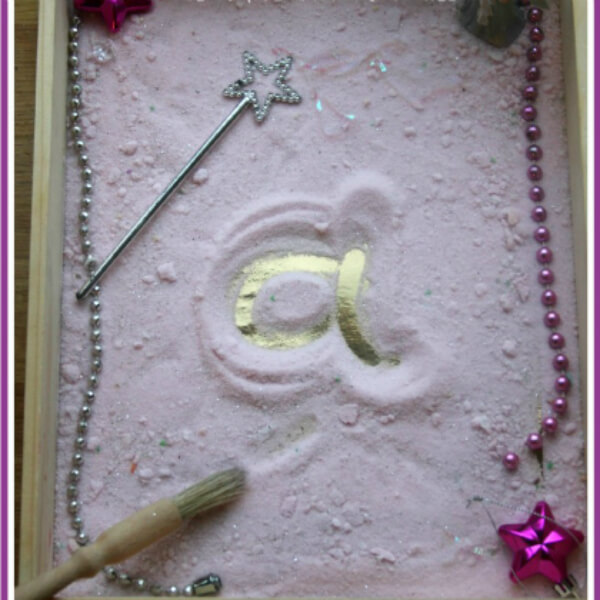
It is a game craft. You can play alphabetical games. To make this, gather your supplies and start by following the given procedure.
Materials Required:
- Fairy dust
- Food coloring
- Table salt
- Glitters
- Wooden tray
- Paintbrush
- Magic stick
- Beads necklace
Procedure:
- Add pink liquid food coloring to table salt.
- Pour it out in a baking tray and let it dry.
- Add some silver glitter to it.
- Line the tray with some gold cards to create magic.
- Then, tip enough fairy dust to cover the bottom.
- Now add some decoration to it. Design the borders with bead necklaces. Put the fairy stick in the tray and place the decorative rings at the corners.
- Now use your paintbrush to play the games. Write alphabets or any other things to play the games.
5. Fairy Tale Craft Made By Egg Carton
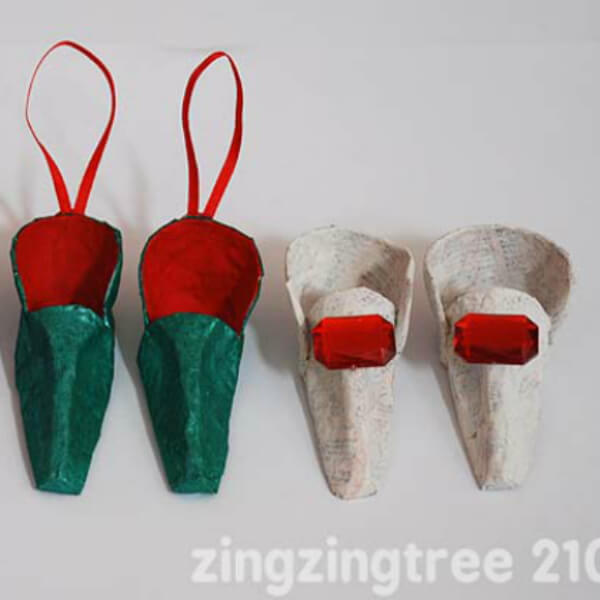
Image Source/Tutorial: Zing Zing Tree
Have you wasted egg cartons? Use them to make the fairy tale shoes for your kids, or kids can also make them, as this craft is so simple and easy. For your Cinderella’s shoes, take an old egg carton and start by looking at the given procedures.
Materials Required:
- Egg carton( with circular ends)
- Ribbon
- Glue gun
- Adhesive tape
- Paint
- Colored papers( optional)
Procedure:
- Take the egg carton and cut it into one-third.
- Then cut one of the thirds into halves and the middle section into four pieces.
- Glue together the corners and one of the center points to make the shape of the shoe.
- Use adhesive tape to join them.
- Now take pieces of old newspaper and glue them on the shoe. Cover the whole shoe with them.
- Let them dry.
- Then paint the shoe with your favorite colors. Here I used green and red paint. You can choose of your own. You can also use colored paper instead of paint to give color to your shoes.
- Glue the loops of ribbon to the back of the shoes.
6. Treasure Craft
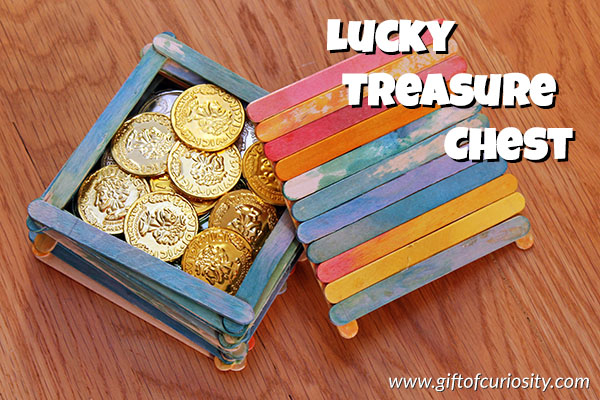
Image Source/Tutorial: Fun-A-Day
We have heard about the treasures of kings. Now it’s time to make a craft related to it. We are going to make the treasured craft. Gather your supplies like Baking Soda, Jell-O powder, Water, and Silver glitter for this amazing DIY. Check the full tutorial at Fun-A-Day.
7. Leprechaun King Craft
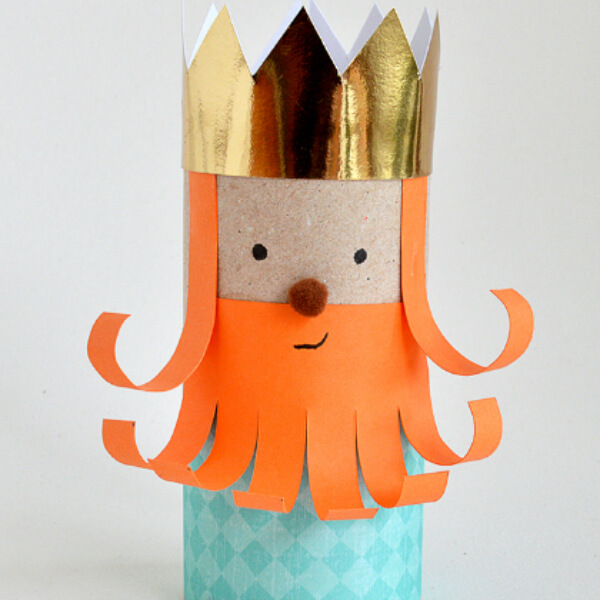
Image Source/Tutorial: Kids Activities Blog
In the fairy tales, we heard about many Kings. In Disney movies, we have seen the leprechaun king. So here we are going to make a craft of the Leprechaun king. Gather your materials and start.
Materials Required:
- Toilet paper roll
- Scrap papers
- Golden sheet
- Black marker
- Mini pom pom
- Printed sheet
- Glue
- Scissor
Procedure:
- Take the printed sheet and cut it into a rectangular shape. Glue it on half of the tube.
- Then take the Orange sheet for the beard. Cut it into a rectangular shape and then cut the half strips from it. Cut out two other long strips for the side beard.
- Roll the strips by using a pencil or pen.
- Glue the beard on the upper half of the tube. Also, glue the side beard.
- Then take the golden sheet and cut out a crown shape from it.
- Glue it on the top of the tube.
- Then glue the pom-pom for the nose.
- Use a marker to draw the eyes and smile of the king.
You are all done! Have fun with your king.
8. Knight Shields Craft
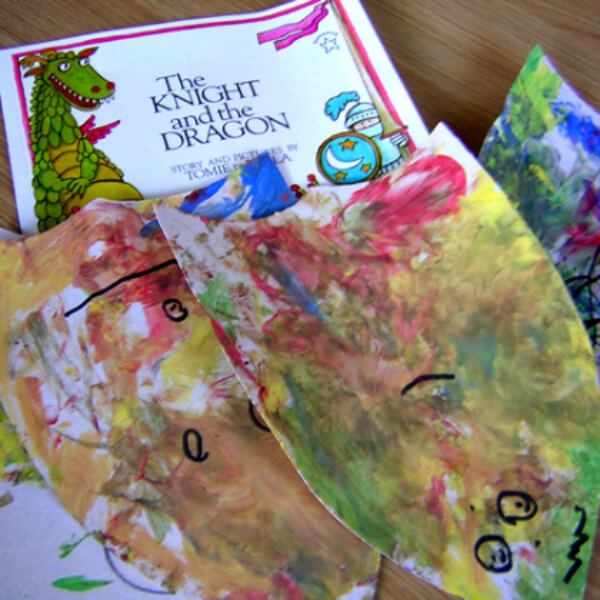
Many of you have read the book “The Knight and the Dragon! So let’s start a craft on it. Have a look at the given procedure and collect the supplies needed.
Materials Required:
- Strong sheets
- Paint
- Glue
- Marker
Procedure:
- Cut out four knight shields from a white sheet.
- Now all you have to do is paint the shields.
- Use different colors on one shield. Move your brush freely to paint.
- If you have gone through reading the book, you probably found that the knights have shields with scary faces on them. So let’s try it in our crafts too.
- Draw faces on your shields using a black marker.
Your shields are ready! Play your games!
9. Paper Gingerbread Men
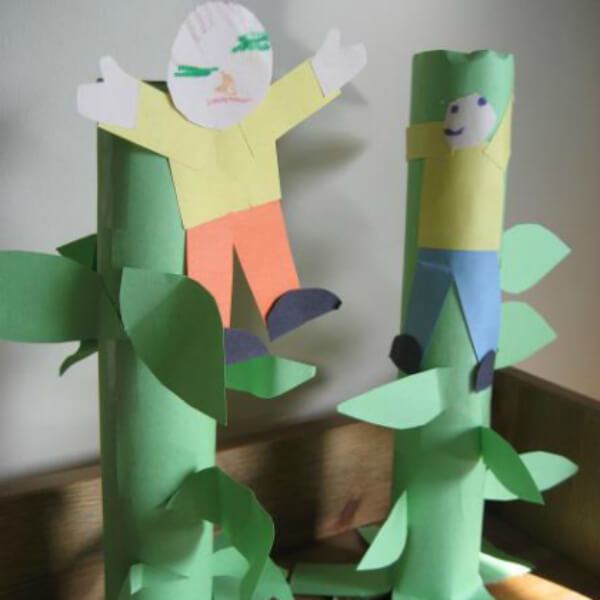
Image Source/Tutorial: Family Theme Days
Use your toilet paper rolls to make this craft of gingerbread men. You will enjoy and learn new creativity from this! Let’s start!
Materials Required:
- Toilet paper rolls
- Colored papers
- Glue
- Scissor
- Crayon
Procedure:
- Take the toilet paper rolls and glue them on one another to make a tree. Then cover them with green paper using glue.
- From the same green sheet, cut out the shapes of leaves and glue them alternatively on the tubes.
- For making the men use the different colored sheets to cut out the clothes. Glue the shirt and pants together. Also, cut out the shoes from a black sheet and glue them.
- For face and hands, use a white sheet. Cut a circle for the face and cut out the shapes of hands. Glue them in their appropriate positions.
- Draw the face using crayons.
- Glue the men on the tubes.
10. Paper Bag Teddy Puppets And Princess
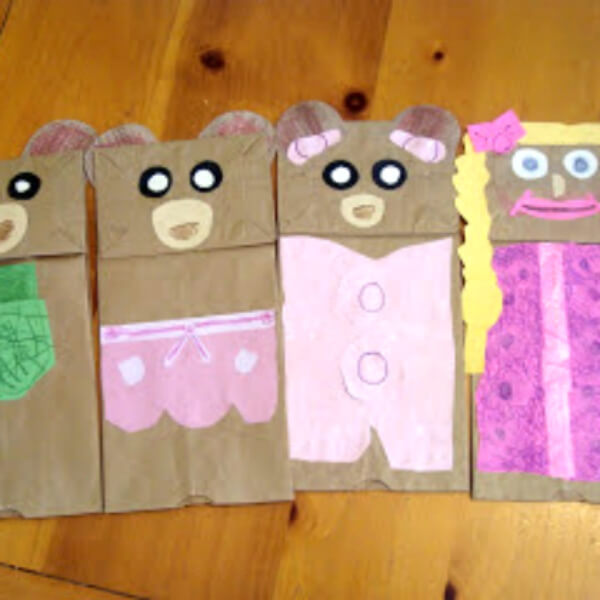
Image Source/Tutorial: Nat Mac’s Knick Knacks
Make paper bag puppets by following the given instructions. You can use them to keep your candies, etc. These are hoppy puppets which you can make in a very simple way. So let’s start!
Materials Required:
- Brown sheets
- Colored papers
- Scissor
- Glue
- markers
- Cupcakes covers
Procedure:
- Take the brown sheets and make four puppet bags. For this first, make the envelopes for the face and then the bags for the body.
- They take the colorful sheets and cut out the designs for their dresses. Here, I made the coat for a teddy puppet and other clothing.
- Use markers to decorate their dresses.
- Take a black sheet and cut out two pairs of circles for each teddy. Also, cut out two small circles for the inner eyes. For the last teddy, cut out circles from a white sheet that is a female puppet.
- Use cupcake covers to make their ears. Glue them on the back of teddies.
- For the female puppet, cut out a long braid from a yellow sheet and glue it on one side of that puppet. Cut out lips from the ink sheet and glue them at face.
- Now, cut out mouths from light brown sheets and paste them on teddy’s faces.
- Here you are, all teddies with the princess are ready! Enjoy!
11. Mermaid Craft For Kids
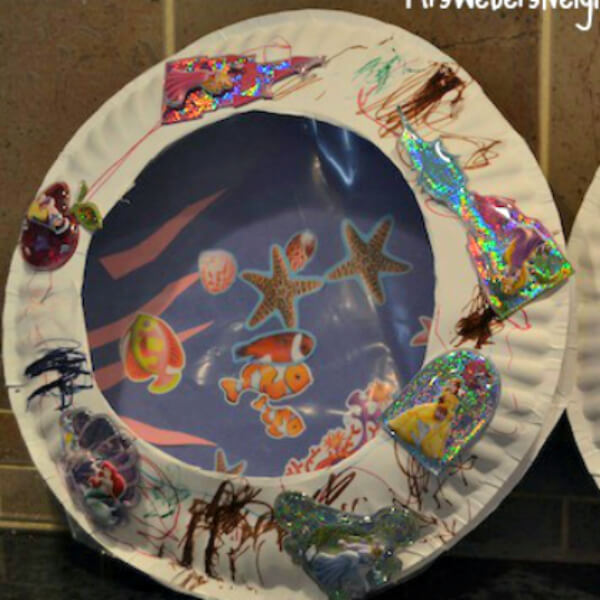
Image Source/Tutorial: Mrs. Weber’s Neighborhood
Think about mermaids and things related to them. When you start reading a book of fairy tales, you get the stories of many mermaids. This time, you have to make a craft related to them. Take your paper plate and other necessary materials that are given below, now, and let’s start!
Materials Required:
- Paper plate
- Construction papers
- Tape
- Stickers
- Markers
- Plastic bag
- Glue
- Scissor
Procedure:
- Cut out the center of the paper plate. In short, get the rim of the paper plate.
- Then use that circle to cut out another circle from blue construction paper.
- Glue this blue circle on the second paper plate. This is your fish tank.
- Now, decorate your fish tank by using markers and other construction papers. Use stickers of sea animals to decorate the tank.
- Now, take a transparent plastic sheet and cut out the shape according to the tank. Tape it or staple it on the tank to provide a glass-like look.
- You are all done! Enjoy!
12. Beuty And Beast Mirror Craft
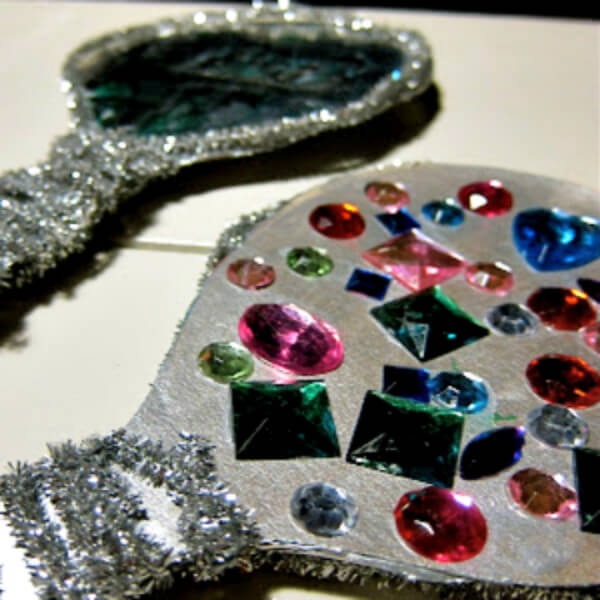
Image Source/Tutorial: Joyfully Weary
Beauty and the Beast is everyone’s favorite. Let’s make a craft related to this! We are going to make a mirror craft. For this, the main thing you need is the cardboard to make the mirror.
Materials Required:
- Cardboard
- Pipe cleaners
- Silver paint
- Foam brush
- Glue
- Decorative stones
- Aluminum foil
Procedure:
- Get the cardboard and cut out the shape of the mirror.
- Take the aluminum foil and cut out the shape according to the mirror. Glue it to a cardboard mirror.
- Paint the back of the mirror with silver.
- Twist the pipe cleaners and wrap them around the handle of the mirror.
- Glue the decorative stones in front of the mirror.
- You can also draw the shapes on the mirror using markers.
13. Clothespin Fairy Doll Craft
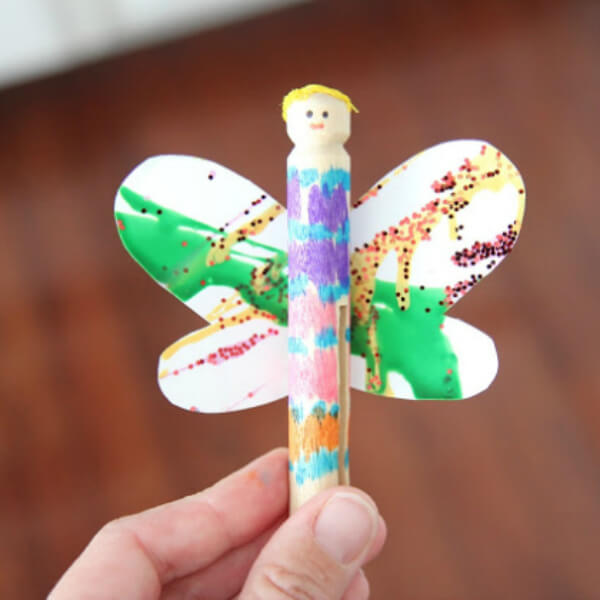
Image Source/Tutorial: Toddler Approved
This is the craft of making a fairy doll. Your daughter will enjoy making this craft. Provide all the supplies needed for her and let her make this herself.
Materials Required:
- Clothespins
- Markers
- paint
- Salad spinner
- Colored papers
- Yarn
- Scissor
- Glue
Procedure:
- Paint your clothespins and let them dry.
- Decorate them with markers.
- Cut the shape of wings from colored paper.
- Add paint and sparkle to them.
- Let them dry.
- Glue them to the back of clothespin dolls.
- Draw the faces on them.
- Let the whole craft dry completely.
Now, you can play with your fairies!
14. Fairy Tales Toad Craft

Image Source/Tutorial: Brimful Curiosities
Have you heard about the fairy tale of Prince Frog? Of course, you did! Should we start to make crafts related to this? Collect some essential materials that are given below and start making!
Materials Required:
- Colorful papers(strong)
- Yellow fluorescent sheet
- Glue
- Scissor
- Black marker
Procedure:
- Take the big green sheet and start drawing the frog.
- Once you complete it, pencil mark the outline with a black marker. Draw the eyes and mouth. You can also take the help of your parents.
- Now, take the red sheet and cut out the shapes of lips from it. Outline by using a black marker.
- Glue these lips on the frog.
- Take the yellow fluorescent for the crown of the rogue Prince.
- Cut out its shape and glue it on the head of the frog.
Your fairy tale frog Prince is ready!
15. Jar Lamp Craft
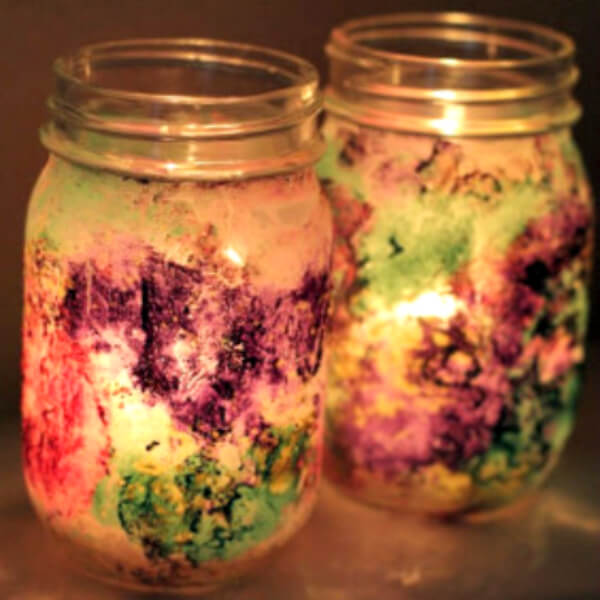
Image Source/Tutorial: Two Daloo
If you want to decorate your home inspired by fairy tales, then you canopt outt of this idea for craft. It will make your home glow as well as provide you with creative skills.
Materials Required:
- Glass jars
- Paint
- Paintbrush
- Candle
Procedure:
- Take the glass jars and paint them from the inside. Remember not to paint them inappropriate manner. Use freehand painting with different colors for each jar, or you can also make prints using your fingers.
- Let them dry.
- Now, put the candle in each jar.
Decorate your home.
16. Rapunzel Castel Craft
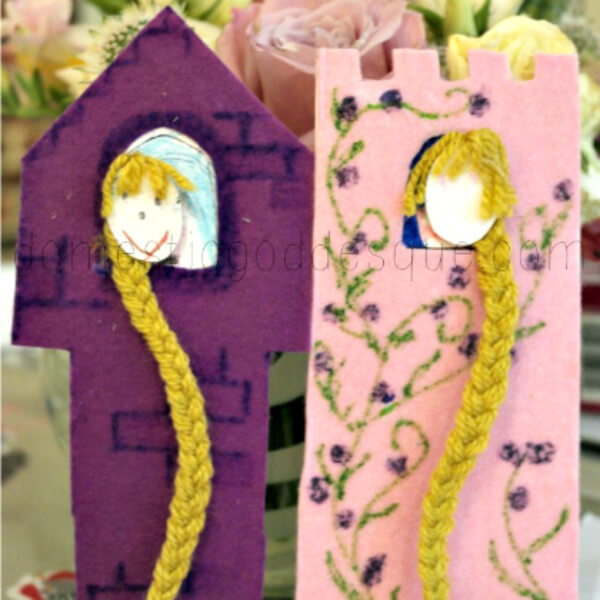
Image Source/Tutorial: Domestic Goddesque
Do you know Rapunzel? Read the story of this princess, and you will get to know everything about her. Here we are going to try a craft related to the Rapunzel fairy tale. Let’s start!
Materials Required:
- Foam sheets
- Crayons
- Yellow yarn
- White sheets
- Glue
- Scissor
Procedure:
- Take the foam sheets of your favorite colors. Here I used purple and pink sheets for Castel.
- Cut out two different-shaped castles from foam.
- Use crayons to make designs on them.
- For its window, cut out two window shapes from white paper and glue them on the upper portion of the castle. Mark outlines on the inside sides with crayons.
- Let’s make the face of the princess. For this, use a white sheet to cut out oval shapes for the face. Draw the eyes and mouth.
- Make long braids for princesses using yellow yarn and cut out hairpieces.
- Glue the face on the windows along with the braid andhairs.
- Glue the braid in a flowing manner.
And your princess castle is ready!
17. Knights Castle World Craft
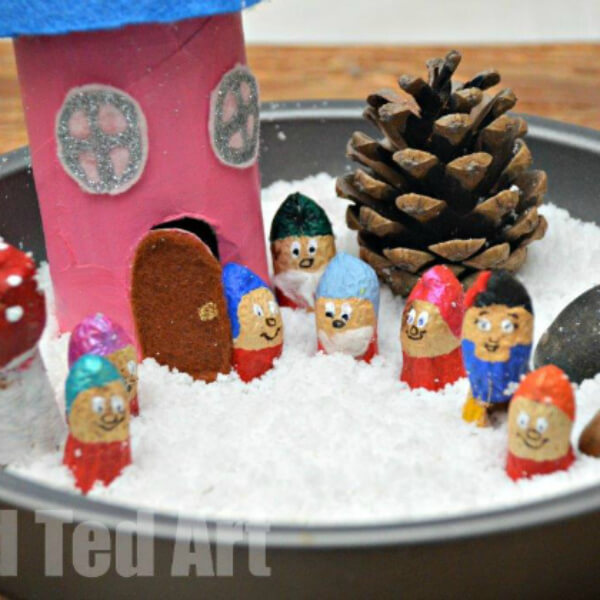
Image Source/Tutorial: Red Ted Art
It is a craft related to the 7 Puppets fairy tale. In this, we are going to make the whole environment of knights. Gather all your materials and start by following the given procedure.
Materials Required:
- Pinecone
- Fake snow
- Toilet paper roll
- Peanut finger puppets
- A plate
- Glue
- Colored papers
- Foam
- Glitter sheet
- Black marker
- Paint
- Scissor
Procedure:
- To make the castle, use your toilet paper roll. Cut out a small gate with the help of your parents. Cover the tube with colored paper.
- By using a glitter ssheett make a cone and glue it on the top of the roll.
- Then, cut out two circles from a white foam sheet and decorate them with glitter. Glue the windows on the castle. Your castle is ready now.
- Then take the peanut finger puppets and paint them accordingly. Use a black marker to draw the face. Let them dry.
- Then take the artificial snow and the pine cone. Fill the plate with snow and put your castle in it. Then make your puppets stand just outside the castle. Place your pine cone near the castle.
And you are all done!
18. Stone Soup Craft
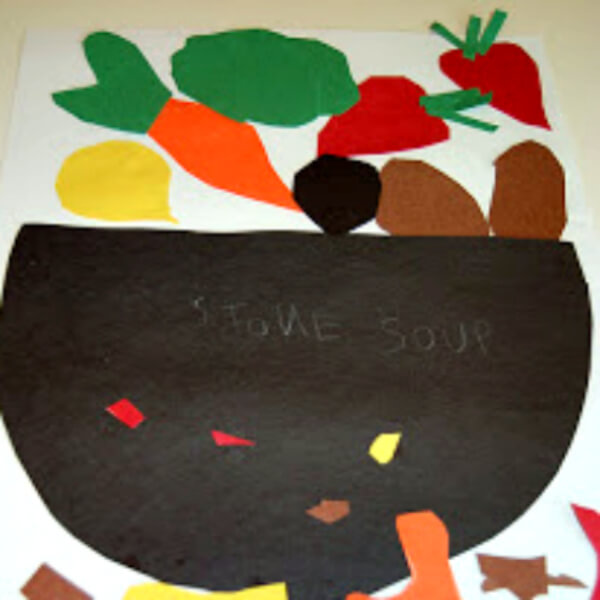
Image Source/Tutorial: Our Creative Day
After reading the book of fairy tales, that is, Stone Soup, you will have a wish to create a craft related to this. So don’t worry! Let’s try the stone soup craft in a very simple manner.
Materials Required:
- Construction papers
- Glue
- Scissor
Procedure:
- Take the brown paper and cut out a basket or pot shape from it.
- Take a big white sheet and glue that pot on it.
- Now, cut out the shapes of Vegetables like carrots, potatoes, etc to make the soup craft.
- Glue these on the top of the pot.
- For making fire and wood, use brown, yellow, and orange paper. From brown sheets, they cut out the shapes of wood. From yellow and orange paper, cut out the structure of fire and glue it below the pot.
In this way, you can create your stone soup inspired by fairy tales!
19. EStarrytary Night Craft
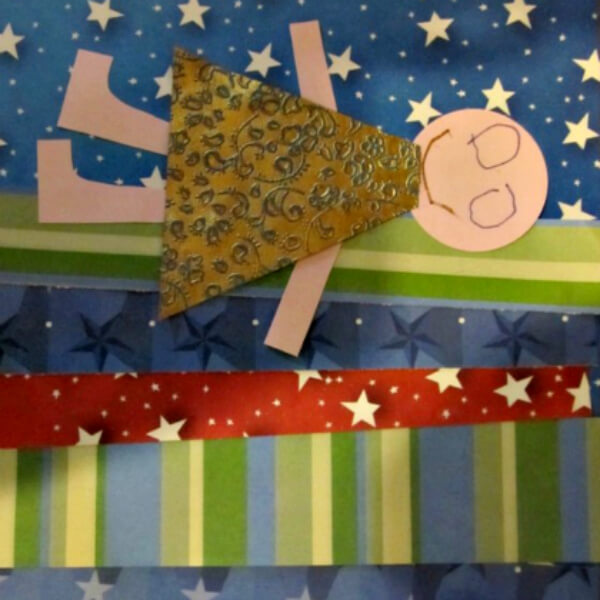
Image Source/Tutorial: Carrots are Orange
Brief Description: Here we are going to make a craft of stary night. For this, gather your supplies and let’s start!
Materials Required:
- Colored printed papers
- Scissor
- Glue
Procedure:
- Take your colored papers and start making a doll.
- For this, you need to cut a face, hands and legs from the skin paper. Cut out a triangle-shaped dress from green printed paper and glue these shapes together to make a doll.
- Use your markers to draw the eyes and mouth.
- Use your printed star papers to put below the doll.
20. Ice CCastleCraft
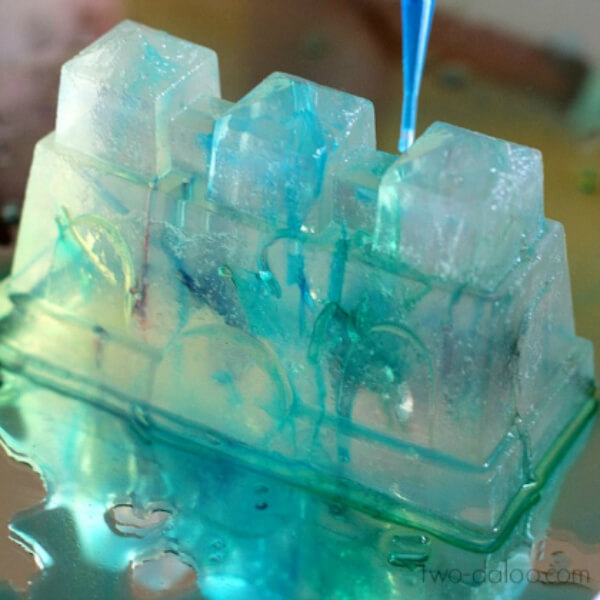
Image Source/Tutorial: Two Daloo
Brief Description: Let’s try the craft of Prince Castle. For this, you need ice and some other things. It will not be a long-lasting craft, but you will enjoy making it.
Materials Required:
- Water
- Castel-shaped box
- Food coloring
Procedure:
- Take the castle-shaped box and fill it with water.
- Place the box in the freezer overnight.
- The next day, take it out and spread some food coloring on it.
- You can also mix food coloring in water before freezing it.
Your castle is ready!
For more ideas for kids, stay tuned with us. We will give you tips to add charm to your crafts.
Easy Fairy Tale Crafts for Kids – Step-by-Step Tutorial
Learn how to make fun fairy tale crafts for kids in this easy step-by-step tutorial. Perfect DIY activity for children at home or school, this creative craft project encourages imagination and storytelling. Follow simple instructions to create magical fairy-tale inspired crafts using basic materials and enjoy a fun kids craft session.
Read More
- Easy Paper Snowman Crafts for Kids
- Easy Popsicle Stick Christmas Crafts for Kids – Winter Crafts
- Easy Pumpkin Crafts for Kids
- Easy Recycled Christmas Crafts for Kids to Make at Home
- Easy Reindeer Crafts for Kids – Perfect for Preschoolers


