


Kids Activities
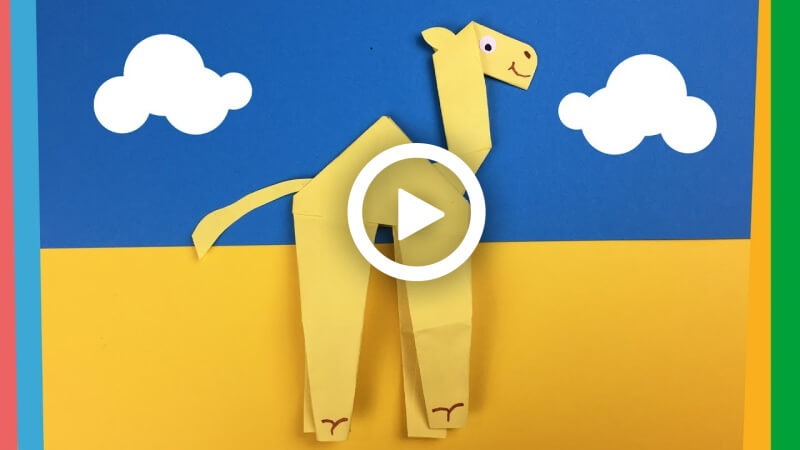
How to Make a DIY Paper Camel

Hi guys! Today’s craft is going to be a very interesting animal. This animal is named the ‘ship of the desert‘. Now you might be guessing right! So let’s leave it without any words. It’s a camel. So, without further words, let’s get into the process!
How to Make a DIY Paper Camel
Materials required:
- A4 yellow colour paper.
- A white piece of paper.
- A black marker pen.
- A brown sketch pen.
- A glue stick.
- Scissors.
Procedure:
- Take an A4 yellow colour paper, place it horizontally on your desk.
- Fold the paper straight from the bottom twice.
- Unfold the paper.
- Twofold lines will be made.
- Cut out two strips from the paper by cutting them through the fold lines.
- Take a strip, fold it in half, then fold each side from the middle fold line by making a triangle shape at the top.
- Take another strip, fold it in half, then fold each side from the middle fold line by making a triangle shape at the top.
- Unfold the strip.
- Apply glue on the middle triangle fold with a glue stick.
- Attach the sides over the glue part of the strip-like before.
- Fold the straight sides of the piece to give them leg-like shapes.
- Apply glue on the folded part with the glue stick.
- Take the other yellow piece and unfold the strip.
- Apply glue on the middle triangle fold with a glue stick.
- Attach the sides over the glue part of the strip-like before.
- Fold the straight sides of the piece to give them leg-like shapes.
- Apply glue on the folded part with the glue stick.
- Take the rest of the yellow paper, cut out a wide, straight strip from its side.
- Fold the strip in half.
- Unfold it.
- Cut a tip of it a little by following the middle fold line with scissors.
- Fold the cut lines of the triangle sides oppositely.
- Fold the piece in half like before, which makes the triangle-like shape together.
- Cut the bottom of the strip a little by following the middle fold line with scissors.
- Fold the cut lines of the triangle sides oppositely.
- Fold the piece in half like before, which makes the triangle-like shape together.
- Apply glue on the folded parts of the strip and attach them with the glue stick.
- It will create the camel’s neck and face portion.
- Take the previous two camel side legs with the lump.
- Take a piece and attach the camel’s previous neck-face shape on the side edge of it with the glue stick.
- Take the other side of the camel’s legs and lump and attach it over this piece with the glue stick.
- Take a white paper, cut out two circles of the same size with scissors.
- Grab a black marker pen, and draw two cute eyeballs on the circles.
- Attach the circles on each side of the camel’s top.
- Take the rest of the yellow colour paper, cut out a very small straight line strip and two same-size ear-like shapes with scissors.
- Attach the straight-line strip as the camel’s tail on its back with the glue stick.
- Attach the ears on both sides of the camel’s top with the glue stick.
- Grab a brown colour sketch pen, draw a cute smile, and highlight the ears and legs with it.
- Your cute paper camel is ready!
Look how beautiful it looks! Decorate your house and gift it to your friends. Let them learn the process. This process is also so fun and easy. So, grab your stationery and make a beautiful paper camel.
FAQ’s on How to Make DIY Paper Camel
Q1. What materials do I need to make a DIY paper camel?
Answer: You will need: construction paper, scissors, glue, a pencil, and a ruler.
Q2. How do I cut the pieces of construction paper for the camel?
Answer: To make the body of the camel, you’ll need two ovals. For the head, you’ll need a circle. For the legs, you’ll need four rectangles. For the hump, you’ll need a triangle. Use a pencil and ruler to draw the shapes on the paper, then cut them out with scissors.
Q3. How do I assemble the pieces of the camel?
Answer: Start with the body. Glue the two ovals together at the top. Then glue the legs and head to the body. For the hump, fold the triangle in half and glue the middle to the back of the body.
Q4. How do I give the camel some character?
Answer: To make your camel more interesting, cut out some ears and eyes from the construction paper and glue them on the head. You can also draw a mouth and nostrils with a pencil.
Q5. How do I make the camel stand up?
Answer: You can use a small piece of cardboard or a thin piece of wood to make the camel stand up. Glue the piece of cardboard or wood to the bottom of the body, then fold the legs and glue them in place.
Q6. What other animals can I make with these techniques?
Answer: You can use the same techniques to make other animals, such as a lion, tiger, elephant, monkey, or even a dinosaur!
q7. Can I use other materials for my DIY paper camel?
Answer: Yes, you can use other materials such as felt, fabric, or foam. You can also use a variety of colors and textures to decorate the camel.
Q8. What other crafts can I make with construction paper?
Answer: You can make all sorts of crafts with construction paper, such as cards, garlands, masks, puppets, and much more!
Q9. How do I store my DIY paper camel when I’m not using it?
Answer: To store your camel, you can put it in a plastic bag or a box. This will keep it safe and dust-free.
Q10. What age is this craft suitable for?
Answer: This craft is suitable for all ages; however, small children will need adult supervision.
This DIY paper camel craft is an easy and enjoyable activity that combines creativity with learning. Whether used for school projects, classroom decoration, or weekend fun at home, this paper craft helps kids improve artistic skills while exploring the fascinating world of desert animals. Try this simple camel craft with your children and turn learning into a fun hands-on experience!
Explore fun and educational ideas for kids with creative crafts, DIY activities, and exciting projects. Join our Telegram and follow us on YouTube & Facebook. Now!
Reviewed By Rachit Gupta
Read More:
- Easy Christmas Tree Craft Ideas For Kids
- Easy DIY Christmas Craft Ideas for Kids
- Easy Paper Snowman Crafts for Kids
- Easy Popsicle Stick Christmas Crafts for Kids – Winter Crafts
- Easy Recycled Christmas Crafts for Kids to Make at Home


