

DIY and Crafts
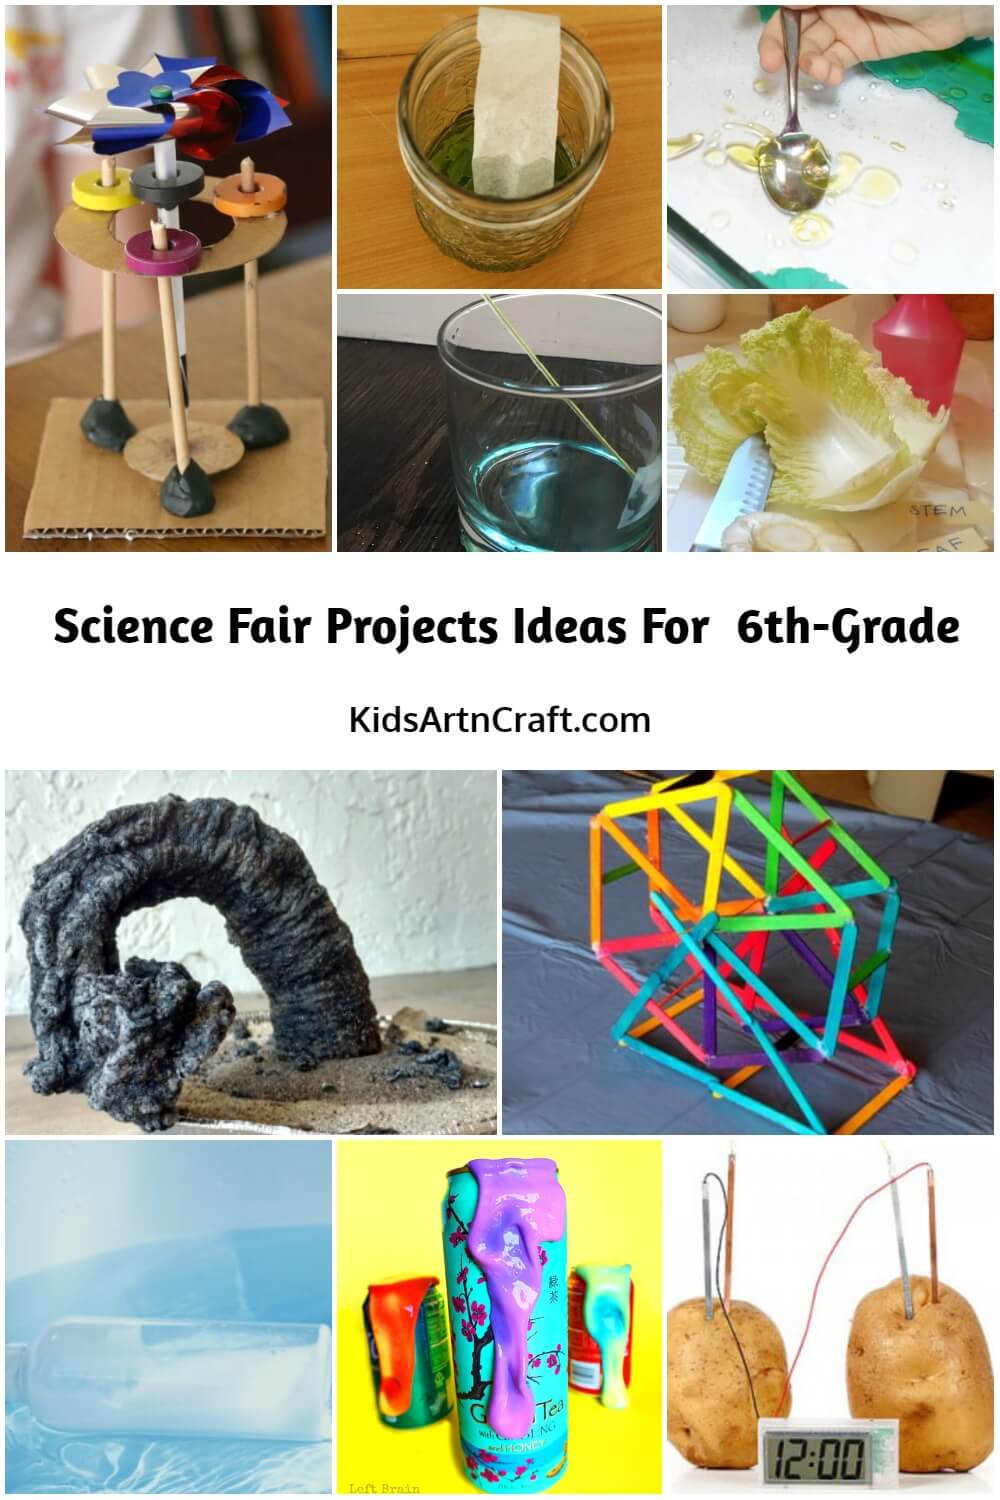
Science Fair Projects Ideas For 6th-Grade

Explore exciting science fair project ideas for 6th grade! Discover fun, hands-on experiments in physics, chemistry, and biology to inspire young scientists.
If you’re searching for science fair projects ideas for 6th-grade, you’re in the right place! Keep your learning spirit alive with our curated list of science fair project ideas for 6th-grade like how to turn milk into plastic, fun science experiments with a magic spinning pen, and how to make an electromagnet train science project.
Science Fair Projects Ideas For 6th-Grade
Read More: Easter Crafts for Adults
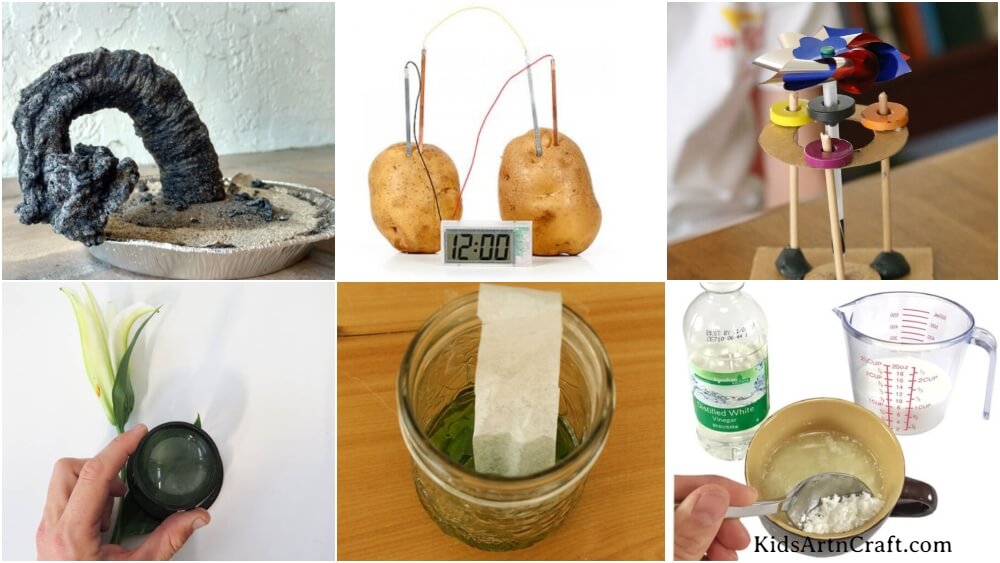
Carbon Sugar Snake Science Fair Project
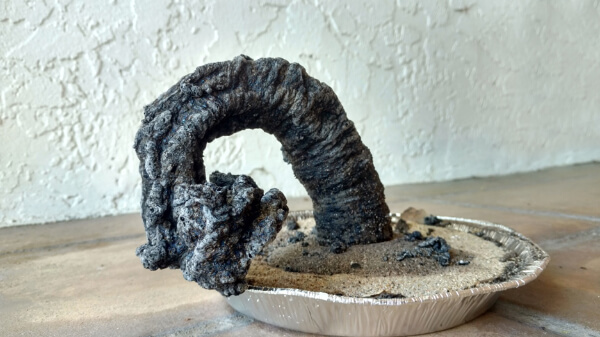
Image Source/Tutorial: Kiwico
Wait! What? Am I hearing it right that a black carbon snake can rise from the ground? Sounds Magical! To bring the snake out of the land, you’ll need sand, powdered sugar, baking soda, lighter, and other basics. Fill a bowl with sand and mix some baking soda and powdered sugar in the middle. Lit it with the help of lighter fluid and lighter. Have some patience, and you’ll see the magic that black snake is coming out of the land. Take fire safety precautions while experimenting with this. Try this at home but Make sure to light the sand on a secure and heatproof surface in an area with adequate air circulation.
How To Turn Milk into Plastic
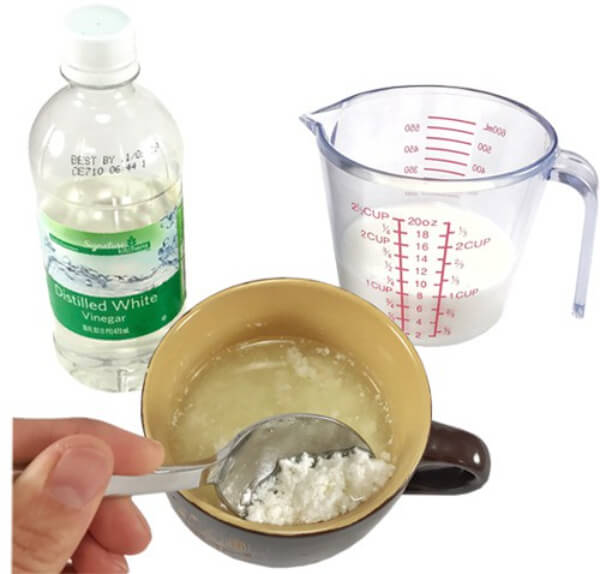
Image Source/Tutorial: Science Buddies
Would you believe it if I told you that you can create plastic from milk? It’s true! All you need is some liquid vinegar. Heat the milk, add vinegar, and strain it. Put the clumps on a piece of paper and add some food coloring for a bit of color. Cut out your desired shape with a cookie cutter and leave it to dry for two to three days. You’ll have a super cute and magical plastic item that you can hang on your wall or ceiling! Through this experiment, kids can learn about the chemistry concepts such as molecules, polymerization, polymers, and more.
Making A Rubber Band Bottle Using Popsicle Sticks For Beginners
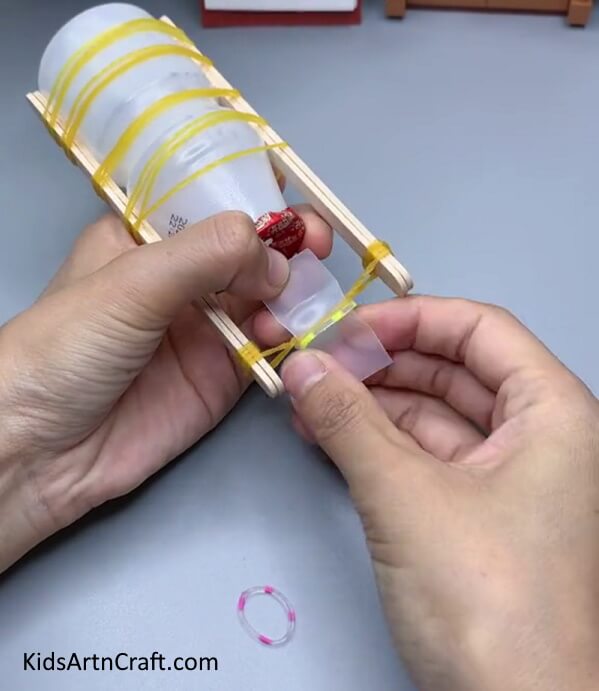
Making a rubber band bottle using popsicle sticks is a great beginner craft project. It is easy to make and requires only a few simple steps. With a few supplies and a bit of patience, you can make a fun and creative bottle that is perfect for storing small items.
Simple Science Project: Baking Soda-Powered Boat
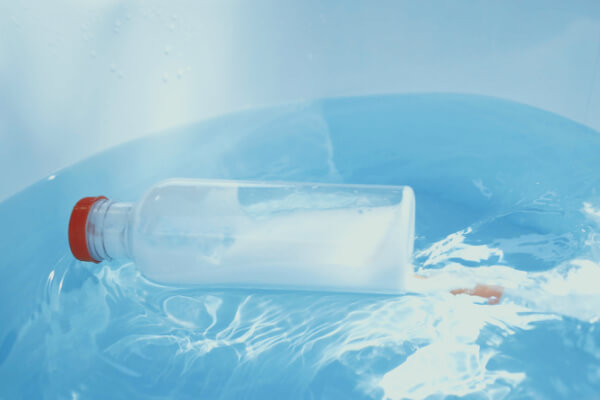
Image Source/Tutorial: Kiwico
Build your own baking soda experiment boat to race and learn the science behind it. This is an outdoor experiment that requires a plastic bottle, straw, baking soda, and vinegar. By combining vinegar and baking soda in a bottle with a straw, you’ll see that the bottle boat is drifting on the water. The reason behind this is that when you combine baking soda and vinegar, it causes a chemical reaction that produces carbon dioxide gas. This gas is released through a straw and provides the propulsion for your bottle boat, just like a jet engine on an airplane that propels it forward by expelling hot gas out the back. Enjoy drifting your soda bottle!
Fun Science Experiment With Magic Spinning Pen
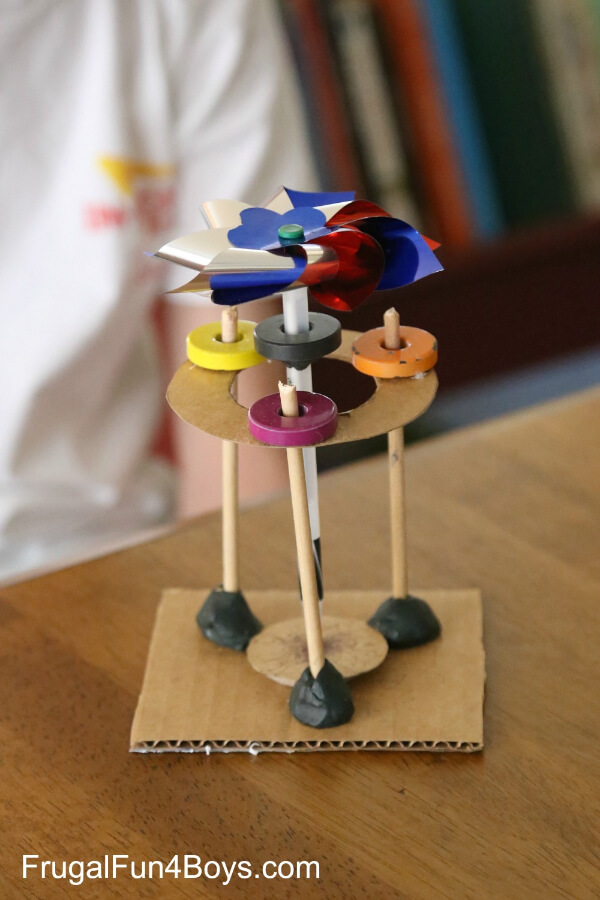
Image Source/Tutorial: Frugal Fun4 Boys
With this science activity, explore the principles of physics enjoyably and creatively while teaching about centrifugal force. It takes a bit of skill and finesse to keep the pen from toppling over while spinning it. To perform this experiment, all you require is – square cardboard, ring magnets, modeling clay, coin, dowel rods, and basic materials. You can learn how gravity and momentum work together to create a spinning sensation through this experiment. This experiment is a great way to spark creativity and scientific thinking in kids of all ages. So, why not give it a try?
How To Make Electromagnet Train Science Project

Image Source/Tutorial: Frugal Fun4 Boys
Read More: Pinecone Crafts For Kids
We all love trains but ever thought of running through the battery and copper wire? Yes, we can build that, follow the procedure to build the same train. First, we will take the battery place our magnets and place it on both ends, and make sure their poles are facing the other direction, otherwise, the train won’t run. Next, we will take the copper wire and wire cutter to cut the wire to the appropriate size make the coil, and make sure that it is close to the train to make the train run. Finally, you can run the train now. Through this activity, we learn how electromagnetism works as it is the combination of electricity and magnets. In this activity, we combined them both when we placed the electric wire and magnets together forming an electric charge which allowed the train to move. We hope you build this and learn how electromagnetism works.
Holiday Card Circuits: A Fun Science Experiment
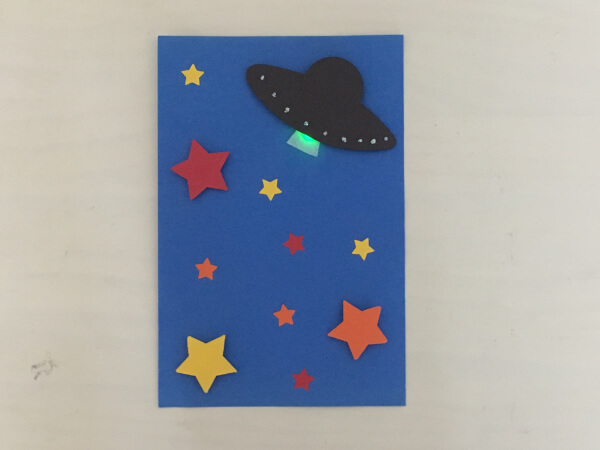
I knew aliens were real, look how they are roaming our stars in their UFOs. This is great UFO craft and if you wanna make it, I know, then follow the procedure to roam like them to the stars. First, we will take our construction paper as the base, and using other papers we will make the UFO and place it on the top side of the paper. Then we will make our stars using decorative paper and paste them on paper using glue. For our light, we will leave a space below the UFO and then cover that using tissue paper. After that, we will take aluminum foil and using blue and black markers draw the electric circuit and the pattern you want to follow. Then follow the pattern place cell batteries and LEDs and paste the circuit using a glue stick. Finally, you will the light coming out of UFO, completing the activity. Through this activity, we learn how we can build an electric circuit and use cell batteries and LEDs to glow.
How To Make Homemade Camera Obscura With Coffee Cans
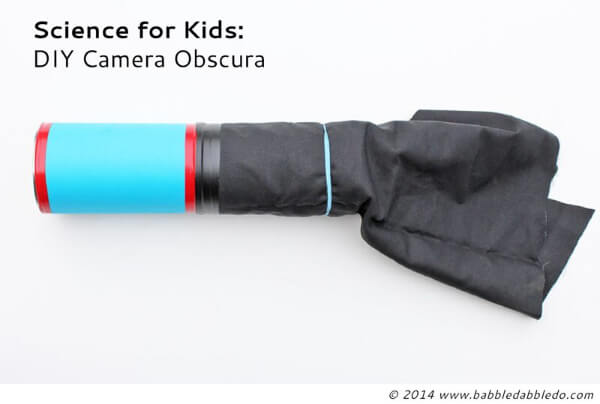
Image Source/Tutorial: Babble Dabble Do
To make a camera using coffee tins sounds funny and unrealistic, but we are going to do it. For this, we need two coffee tins, black construction paper, scissors, an exacto knife, duct tape, a small nail, a hammer, a black canvas, colorful paper, and double-sided tape. First, we will cut the black paper and then place it inside the coffee tin. Then, we will place the lid in one can, which will become the screen of our camera. After that, on the first can, place one nail on the bottom side of the can and make a hole. Take the second can and, using an exacto knife, cut its metal part and then join both cans using heavy tape. After that, use colorful paper to cover the cans and use double-sided tape to stick it. Finally, take a piece of black canvas and paste it on the end side of the camera, this will help us in blocking light. Through this activity, we learn how the camera works and how light passes on its reflections. Kids can create this with the help of parents and learn how we can make cameras using home materials and learn how these activities can teach them.
Color Changing Slime From Heat
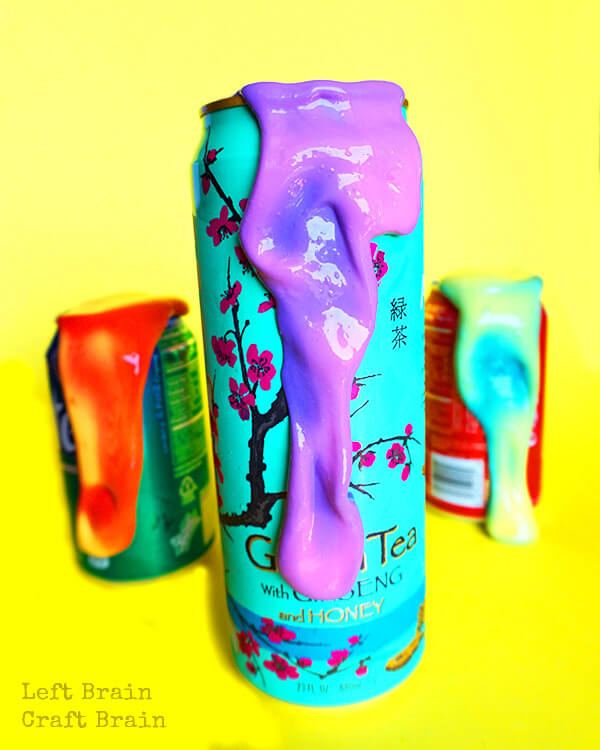
Image Source/Tutorial: Left Brain Craft Brain
Can we change the color of the slime with heat? Yes, we can, following the procedures. First, we will add our glue to a bowl and mix it with water. Then, we will add food coloring to the bowl, add thermochromic pigment, and stir it well. After that, we will add starch to the mixture, and finally, we will stir all the mixtures. You will see how it changes its colors well. Through this activity, we learn Thremochromism and with the change of heat the color of slime.
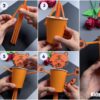
Easy Science Project: Ferris Wheel Out of Popsicle Sticks
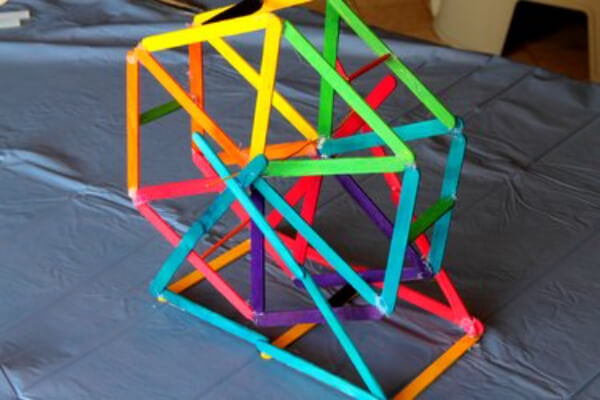
Image Source/Tutorial: E How
I know we all love rides, they are so exciting and fun to enjoy and we wish that we could make our rides, but we can make it, how? Follow our procedure to make your own Ferris ride. To create this, all you need is popsicle sticks, glue, paper clips, and tape. First, we will make our two wheels of Ferris by sticking the sticks in triangles and forming them in circular form, then we will take five popsicle sticks and join the two wheels by placing them in the middle and on the sides. After that, we will make the base by making two square bases and two big triangles on both sides. Finally, your ride is ready. Through this activity, we learned about bases and areas and how using triangles and squares we made such a brilliant ride.
Oil Spill Clean Up Experiment For Toddlers
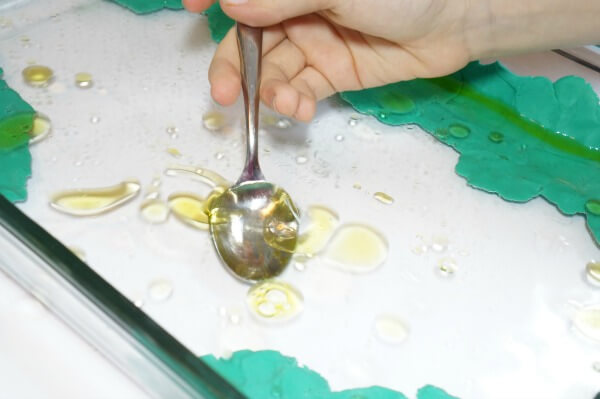
Image Source/Tutorial: Kitchen Counter Chronicles
Read More: Boy and Girl Drawing Ideas for Kids
We know how oil spill in big oceans damages our environment and hurt birds and fish in the water but we also want this awareness for future generations, by doing this activity we shall be able to teach our young ones how damaging oil spills are to our environment. For this, we will take green modeling clay, water, a large container, cooking oil, an ocean toy animal, cheesecloth, dish soap, and a spoon. To create this, we will take a large container and using clay we will make land and then pour water and our toy animal. In the next step, we will pour oil and then see how quickly it spreads to water and even absorbs our animal. We can clean this using cheesecloth, dish soap, and a spoon but it will take some time and a lot of effort, explain to us how an oil spill can be dangerous and how it affects our environment.
Traveling Water Experiment At Home

Image Source/Tutorial: Rookie Parenting
Water is an amazing thing because it has so many properties, that can amaze us for a while. In this experiment, we will see how water travels through the string. For this, we require water, two cups, scotch tape, and a cotton twine string. To create this, first, we will take a cup and tape one side of the string on it take the filled cup, and place the free side of the string in it. After that, pour the water from the filled cup to the empty one while not stretching the string, and then again do the same thing and you will see how the water travels through the string. Through this activity how water molecules are attached and rather than falling straight into the cup they became attached and their molecules traveled on the string, making our activity successful.
Archimedes Squeeze Science Experiment
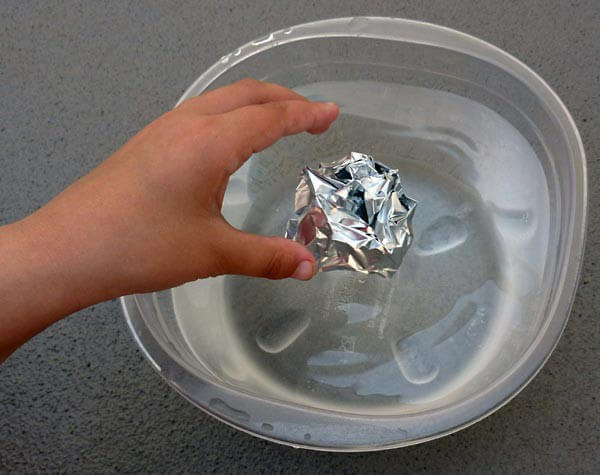
Image Source/Tutorial: Science Buddies
Archimedes was a famous ancient Greek mathematician and scientist, who discovered that when you place some object in the water, it will float or sink based on the density of the object. If it has high density it will float and if it has low density then it will sink. For this activity, we will take a water container, aluminum foils, and scissors. First, we will cut 3-4 pieces of aluminum foil around them together, and then place an underwater container, you will see that it pushed the water a little but it ultimately sank. Through this activity, we learn about Archimedes’s principle and how buoyant force works when we place objects in the water.
Easy Activities For Learning Catapults And Trajectory
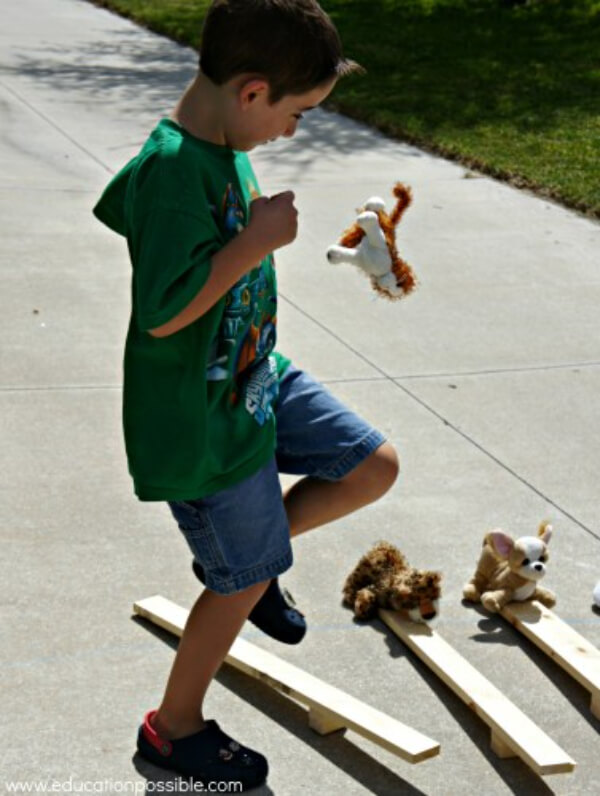
Image Source/Tutorial: Education Possible
Catapults were medieval weapons that were used to break heavy fort walls. Catapults used force and pushed heavy stones onto the enemy walls, destroying their forts. But in this experiment, we are not destroying anyone’s fort but learning how catapults work. For this, we will take square wooden strips, stones, and soft animal toys. We will perform this by placing the stone below the strip and making sure you keep the stone a short distance on the side and the other side will be long where we will keep our toy. We will push the shorter side of the wood by pressing our leg, giving it a force that will throw the toy other side. Through this activity, we learn how force works and how we can create lever-type objects to understand the nature of force.
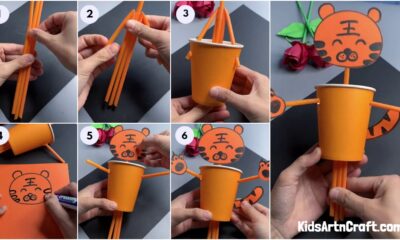
How To Make A Potato Battery
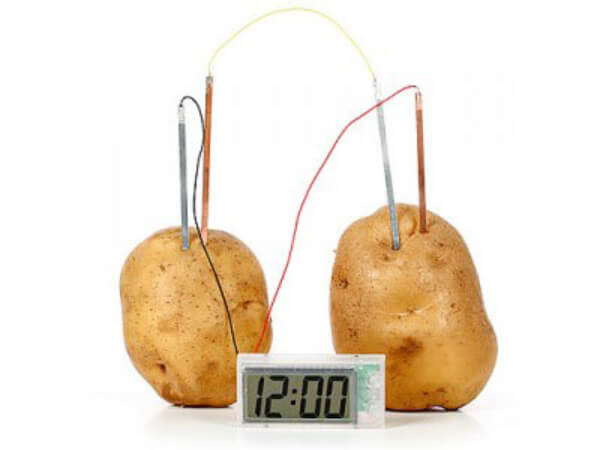
Image Source/Tutorial: Kidz World
To make a battery from potatoes sounds crazy but we can create it, all you need is two potatoes, two pieces of copper wire, galvanized nails, three alligator clips, and low-voltage LED clocks. We will take the clock and remove its batteries, then place two nails on the potatoes and through that, we will place our copper wire and then connect them using clips. We will place the wires in the clock remembering which side is positive and negative. After connecting them you will see that it is working like magic but is no magic, it is science. Through this activity, we learned how zinc nails and copper wire reacted to each other and as potato stands as neutral, the wires were able to transfer their heat and make the clockwork.
Fun Sound Experiment for Kids

Image Source/Tutorial: Kcedventures with Kids
Read More: Cute Animal Drawings for Kids
Learning about sound and sound waves creates a great feeling that some amazing this going to happen, with this experiment also we are going to feel something amazing. To do this activity, you need a spoon, a ruler, and some yarn. Take the spoon and tie a knot using yarn, and make sure to tie it hard so that the spoon hangs on it. After that, place the two pieces of yarn near your ear and then gently touch the spoon using a ruler, you will feel the sound through the yarn which would sound amazing, and a warning, don’t bang the spoon too hard. Through this activity, we learned about sound and sound waves and how with a gentle touch sound waves generate and travel through yarn, and these waves which we cannot see travel through air and reach our ears.
Wool And Battery Science Experiment
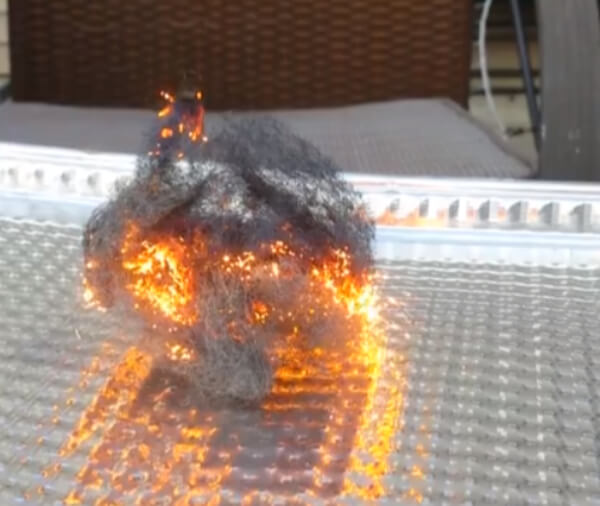
Image Source/Tutorial: The Homeschool Scientist
Creating such a fire using steel wool and a battery looks cool and a little dangerous, so perform this activity with your parents and in a clean, nice area. To create this, you need fine steel wool, a 9-volt battery, and a baking pan. We will place steel wool on a baking pan and then touch the wool with the battery, you will see that almost catches fire and will be burning for a short period. Through this activity, we learned how oxygen works with fire and how steel wool came with fire as it has space in between them which is filled with oxygen, and when the battery touched with wool, it generated heat creating a circuit.
Microbes-Bacteria Experiment For Kids
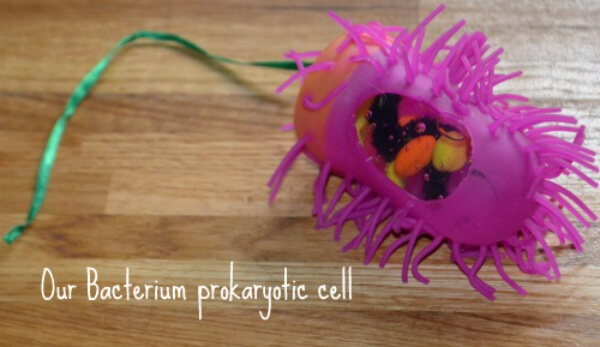
Image Source/Tutorial: Angelicscalliwags
Bacteria and microbes are important parts of studying biology, no matter how dangerous they are to humans and sometimes even helpful, learning and studying about them is important. For this, we created a bacteria using a stress ball, colorless hand gel, a chunky test tube, twisted pipe cleaners, playing dough, ribbon, and scissors. First, we will place hand gel in the test tube as cytosol, then its inner parts plasmids, and ribosomes as playing dough, created DNA by placing pipe cleaners and closing the lid. We will use scissors to cut an opening in the stress ball and place our Pilli in. Finally, we place our ribbon or flagellum at the end completing our bacteria. Through this activity, we learn about what a bacterium cell looks like and students can learn about its parts and structures through this model.
Leaves Color Changing Science Experiment
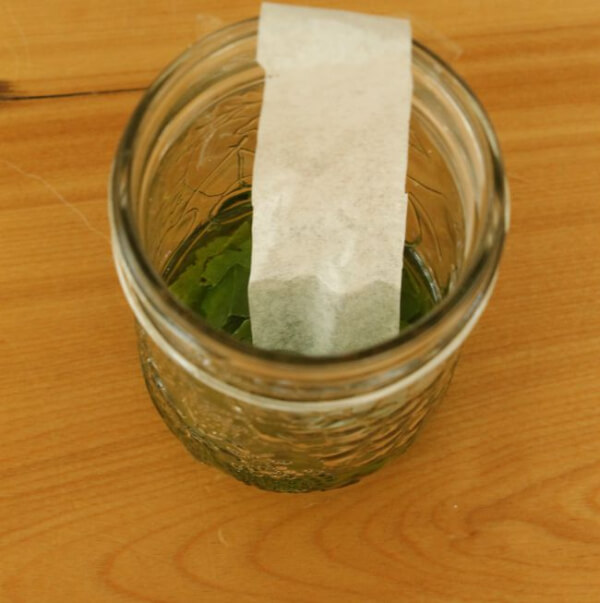
Image Source/Tutorial: How Wee Learn
Tree leaves look so good and green, but why green? It is a question our young ones ask and for them, we can create an experiment to explain why leaves have green color and how we can change their color. For this, we need three leaves, a glass jar, rubbing alcohol, a plastic baggie, a paper coffee filter, a small bowl, a spoon, scissors, elastics, and tape. First, we will crush leaves into small pieces and place them under a glass jar, pour rubbing alcohol onto the leaves enough only to cover them. Then, we will mash them using a spoon for some time and then cover them with plastic baggie and elastics and leave them for an hour. You will see the changes that a green color is forming in the alcohol, place the coffee filter inside while attaching it using tape and you will see that the filter is taking the color and the leaves have changed color. Through this activity, we learned that leaves have a pigment called chlorophyll that is responsible for their color and they change color when they fall in the autumn season.
Biodomes Engineering Design Project For Science Fair
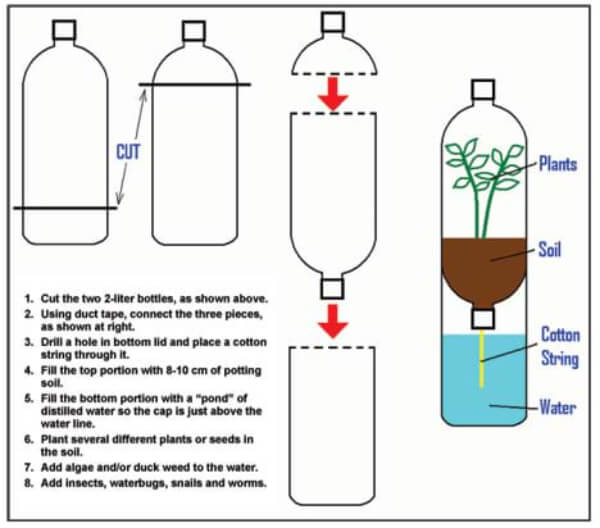
Image Source/Tutorial: Teach Engineering
Biodomes are important for studying our environment and to learn how all living beings can live together under the same shelter. There are many biodomes in many countries that study the environment but here we are creating not those big domes, but small ones to study our environment and use our engineering skills to build it. For this, we need two-liter bottles, sand, cotton string, duct tape, drill, water, plants and seeds, algae, and small animals like snails and worms. First, we will cut the bottles, one from above and one from below, and join them using duct tape. Use a drill in the bottom, place the cotton string, and create a water pond below it. After that, we place our sand and our insects on the soil where we will place our plant and then cover the upper side. Through this activity we learn about biodomes and how their environment works, this also improves our engineering skills to create this biodome using their supplies.
Compost Cups: Simple Science Project
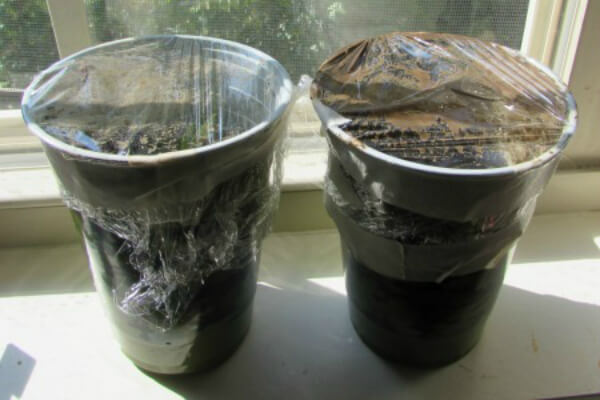
Image Source/Tutorial: The Happy Housewife
Read More: Free Printable Christmas Coloring Pages For Preschoolers
Decomposition is a process where dead animals and plants slowly start to decay and then turn into the soil giving it nutrients back. It is a good process and we can use our bio-waste like leaves and kitchen waste and decompose them to use them in our garden. To perform this, we need plastic cups, organic waste, plastic wrap, water, dirt, and rubber bands. First, we will take the plastic cup and fill it with our waste, dirt, and water, then we will shake it and wrap it with plastic wrap and rubber band and place it near a sunny window. We will leave it for two or three days and at this time we will shake it and pour water in it. After that, you will see that all your waste has turned into soil. Through this activity, we learn about decomposition, how this process works, and its importance.
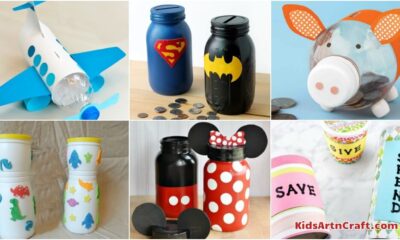
Flower Dissection Science Experiments

Image Source/Tutorial: Instructables
Have you ever thought about how a flower looks, I don’t mean from the outside, we all know how they look, but from the inside, what are its parts and what is their purpose, maybe you don’t know how they look from inside, so let’s check it out and learn about their parts. For this, we will take a Lilly, scissors, and a magnifying glass. When we start, we will see the outer parts called petals which have a brilliant fragrance. For the next part, we will see the stamen which is the male part of the flower which contains pollen, and then the pistil which is the female part of the flower. Finally, we will see the ovary and nectar which contain small seeds for baby flowers. Through this activity, we learn about the structure of flowers and what are its parts, kids can use magnifying glasses to see them more deeply.
How To Regrow Cabbage
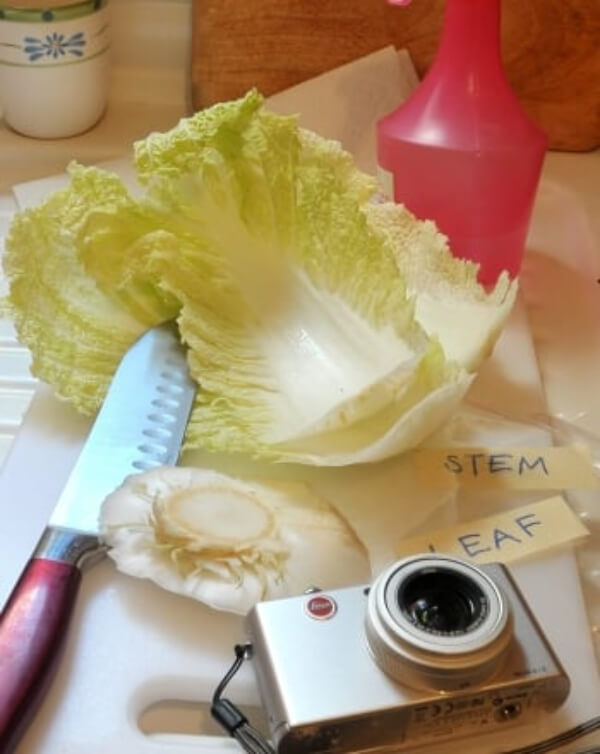
Image Source/Tutorial: Education
Have you ever thought that you can regrow something back? How about a cabbage, we all love this vegetable, and if someone tells you that you can grow it back, I think you will try, so let’s try. For this, we need paper towels, plastic bags, scissors, Naba cabbage, a cutting board, a kitchen knife, a permanent marker, a spray bottle, water, and a camera. First, we will take two plastic bags on one we will write leaf and on the other stem, then, we will fold the towels and spray them until they are completely wet. Then, we will take cabbage, and using a knife we will cut leaves and stem parts keep them aside, and then place them under paper towels and marked plastic bags filled with air. Place these bags under light in a room-temperature environment. Click photos of all processes, after someday you will see that the leaf part is beginning to rot, and the stem part has some growth. Through this activity, we learned that plants have asexual reproduction where their stems will start reproducing themselves giving them growth.
I hope you like our list of Science Fair Projects Ideas For 6th-Grade and will surely try to make them. If you like our ideas and want to read more crafts ideas, Keep visiting our website for the latest DIY ideas and other creative stuff for kids, parents, and teachers. Please let us know in the comment section which Science Fair Project Idea you like the most.
Thank you and have a nice day!
Follow us on Youtube for art and craft tutorials and much more.
More Articles from Kids Art & Craft
- Pencil Shaving Crafts for Kids
- Pinch Pot Craft Ideas For Kids
- Animal Coloring Pages for Kids
- Animal Coloring Printables for Kids
- Learn to draw your kids with these ideas – Step by step


