


Paper Crafts
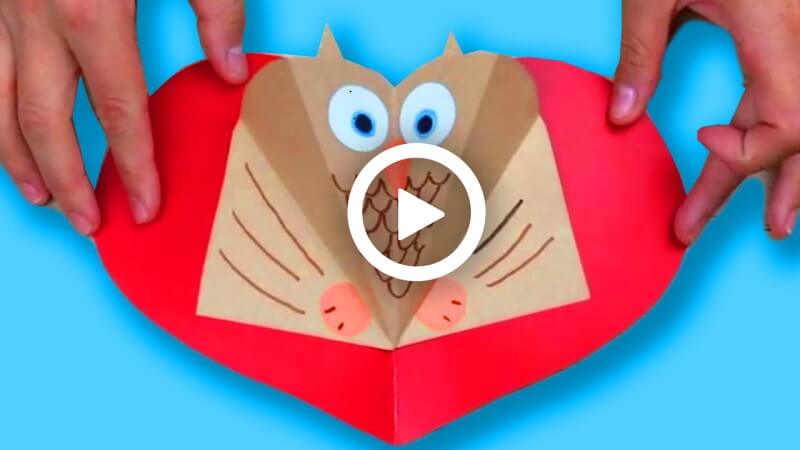
Paper Owl Gift Card for Teacher on Teacher’s Day

Hello readers! There must be very few people whose favorite bird is an owl. Owls are a very rare kind of bird. If you see you can’t always see them. This nightbird is very fascinating to many kids. Kids love making owls as they kind of represent their laziness. Jokes apart! Nowadays, children are very creative and sensitive when it comes to showing their talents. They can be very interested in making an owl containing gift cards. So, let’s get a hold of your stationery and give life to an owl.
How To Make a Paper Owl Gift Card
Materials:
- A light colour rectangular shape page.
- A deep colour rectangular shape, bigger than the previous one.
- A small white page.
- A small orange page.
- A black marker pen.
- A glue stick.
- Scissors.
Procedure:
- Take a light-colored, rectangular-shaped page, fold it in half sideways by making a middle fold line.
- Unfold it.
- Cut the paper into two pieces of the same size by following the middle fold line with scissors.
- Take a piece, then fold it in half sideways by making a middle fold line.
- Unfold it.
- Follow the fold lines and fold the upper sides of the page to the middle fold line by making two triangles.
- Unfold it, and a triangle fold line will be made.
- Fold the papers sidewise from the previous fold lines to the middle fold lines.
- Unfold it, and another triangle fold line will be made under the previous one.
- Turn over the paper and fold it like the other side to make the fold lines deep.
- Fold the middle triangle part and pop out the shape from the paper.
- Cut the upper portion of the paper roundly by making a heart-like shape with scissors.
- Take another deep colour rectangular shape bigger than the previous, fold it in half side-wise by making a middle fold line.
- Unfold it, and that will make two squares on the sides of the middle fold line.
- Again, fold it.
- Take the heart-like shape you made previously, fold the shape in half, and mark its size with a pencil on this big square paper.
- Draw a half heart around the marked area by covering the full paper.
- Cut the drawn half heart.
- Unfold the piece, and a heart shape will be in front of your eyes. It will be the card base.
- Take a white paper, draw circles of the same size, and make eyeballs in them with a black marker, and cut them out with scissors. They will be the owl’s eyes.
- Take an orange colour page, cut out one small triangle shape as the owl’s beak, and two circles of the same size as the owl’s legs.
- Take the owl shape and attach eyes, a nose in the owl’s face, and two legs to the bottom sides of the owl.
- Attach the owl in the middle of the heart shape.
- Your owl greeting card will be ready!
Your owl card is ready for a flight! This process does not need many materials; it is very easy to do. You only have to understand the folds and cut them. You can use them as birthdays, Teachers day, or to wish anybody on any special day. Use your sense of creativity and make it more beautiful. It will make children more concentrated, and they will have fun for sure! So hurry up, get your stuff, and enjoy your cute owl greeting card.
Reviewed By Jatin
Read More:
- Easy Paper Craft Ideas for Kids
- How to Make a Band-Aid Get Well Card – Step-by-Step Instructions
- How to Make a Paper Bunny Step-by-Step Instructions Easy Tutorial
- DIY Mother’s Day Cards
- Crab Crafts & Activities for Kids


