

Drawing
Easy Animal Drawing Tricks for Kids

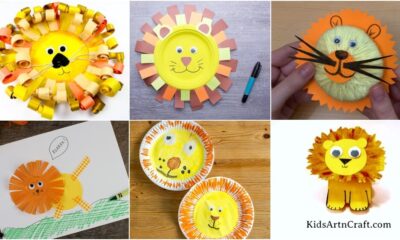
Easy and amazing drawing tricks you must try with your kids. Here are 10 simple animal drawings you should look at and guide your kids to draw. Below are the steps that will help your kid to understand better and to draw the drawings perfectly. Your kids will have fun while drawing, so try these easy drawings and help your kids draw them.
Why Animal Drawing Tricks Are Helpful for Kids
Easy animal drawing tricks help children learn art in a simple, fun, and stress-free way. Using basic shapes, lines, and step-by-step techniques makes drawing animals easier for beginners while improving creativity and confidence. These drawing activities are perfect for preschoolers, elementary school kids, classrooms, and home learning because they encourage imagination and hands-on artistic practice.
Learning simple drawing tricks also helps children understand shapes, proportions, and visual observation while making art more enjoyable and less overwhelming.
Easy Animal Drawing Tricks for Kids
Supplies:
- Blackboard/ green board
- Chalk
1 Drawing: Birds
Steps:
- Draw two 2’s one after the other, and leaving some space, draw again two 2’s.
- Now draw a semi oval at the top middle of both the 2’s, do the same with the other 2’s.
- Then draw a circle on each semi-oval, and on the outside of the semi-ovals, draw a triangle shape.
- Now, at the top of both the triangle shapes, draw a heart.
- Then, from the first 2, draw a line till the bottom of the 2, and then bend the line a little and extend it.
- Now draw a wavy structure at the bottom and a straight line.
- Then do the same with the other 2 as well.
- Now, at the bottom of the 2’s, draw a horizontal line.
2 Drawing: Dinosaur
Steps:
- Draw a line, and at the middle of the line, draw a semicircular shape.
- Then, at the top of the line, draw a half oval and a dot inside.
- Now, from that half oval, draw a straight line and merge it with the semi oval.
- Then, from the backside of the semi oval, draw 2 curvy lines and merge them at the end.
- Now, inside the bottom of the semi oval, draw a curve.
- Then, below the semicircle, draw 2 vertical lines and a horizontal line, and then again draw a vertical line and a horizontal line at the side.
- Now, from the straight line, draw curvy structures at the end of the tail.
3 Drawing: Dolphin
Steps:
- Draw a C and then from the C draw a tilted 2 by curving the last line.
- Then, from that point, draw a small curve, and then draw a less curvy C.
- Now, from that, draw a tilted line and a curvy V shape, and a line merging the first C.
- Then, from the inside of the 2, draw a curvy line, and then draw a tilted V outside the first C.
- Now draw 2 tilted V’s, one on the inside of the less curvy C and one on the outside.
- Then draw a circle inside the first C as an eye.
4 Drawing: Turtle
Steps:
- Draw a semi-oval and at the end make a curve.
- Now again draw a curve below that, and draw 2 lines on each side, and merge it with the previous curve.
- Then, from the side of the semi oval, draw a curvy structure as shown, and draw a circle and a small curve inside it.
- Now, at the bottom, draw 2 semi-oval shapes on each side as legs.
- Then, at the side of the semi oval, draw 2 curves and narrow them at the end.
- Now, in the middle of the semi oval, draw a hexagon shape, and from the ends, draw lines and merge them with the ends.
5 Drawing: Tree
Steps:
- Draw a curve, and then on the top side, draw a V shape, and on the side, draw an L shape.
- Now, from the bottom of L, draw a curve.
- Then draw a few curves on them, and then from the top, draw cloud shapes and merge them with the bottom curves.
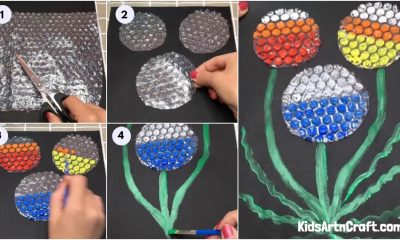
6 Drawing: Scissor
Steps:
- Draw an X shape and then draw 2 semicircles on the bottom lines of the X.
- Now draw a small semicircle inside each semicircle.
- Then, on the upper lines of the X, draw a curve on the outside of the line on each side.
- Now, at the midpoint of the X, draw a circle.
7 Drawing: Elephant
Steps:
- Draw a 1 and leave some space, draw 2 and a tilted 3.
- Now draw a 4 by extending and curving the line of 4.
- Then, at the side of the 1, draw a small ”r” and from the top line of ”r” draw a curve touching the top of 2.
- Now draw a 6 from the side of 4 and the line of 6 crossing the line of 4.
- Then draw a 7 touching the tilted 3 and draw a tilted 8 between the 1 and the ”r”.
- Now draw a 9 between the 6 and 7, and then draw 10 inside the 6 and 4.
8 Drawing: Fish
Steps:
- Draw a small 3 and then at the back of it draw two big 3’s.
- Then, from the top and end of the small 3, draw a curve on each side and merge it with the big 3, and draw 2 lines in the middle.
- Now, from the big 3, draw 2 curves from each end and merge them at the front.
- Then, at the front of it, draw a curve and a dot inside.
- Now, outside the curve, draw a small 3 as shown.
9 Drawing: Fox
Steps:
- Draw a triangle shape, and in the bottom middle of it, draw a big triangle.
- Now, from the side of the big triangle, draw another triangle shape as the tail.
- Then, at the top of the small triangle, draw 2 triangles on each side as ears.
- Now, at the side of the small triangle, draw a dot and 3 lines on each side.
- Then, inside the small triangle, draw 2 curvy lines as eyes.
- Now draw 2 triangle shapes on the inside bottom of the big triangle.
10 Drawing: Puppies
Steps:
- Draw a tilted 6, and then from the same line, draw another 6 with an oval shape at the end.
- Now draw a curve at the bottom of each 6.
- Then inside one six, draw 2 oval shapes as eyes, and then below that a dot, and then a tilted 3.
- Now, on the other 6, draw 2 curves as eyes, and then a dot, and then a tilted 3.
- Then, at the bottom of the first 6, draw a curvy W and do the same with the other 6.
- Now, inside the curvy W’s, draw an oval at the middle of each and 2 curvy lines on each side of the oval.
You are done with all 10 animal drawings. Easy and simple drawing that your kids must try. These will help them to learn more, and they will enjoy it. So engage your kids in these drawing activities and let them have fun.
Read More:
- Boy and Girl Drawing Ideas for Kids
- Christmas Drawing for Kids – Step-by-Step Tutorials
- Easy Animal Drawing for Kids – Step By Step Tutorials
- Easy Animal Drawings for Kids To Enlighten Your Budding Artist
- Easy Chalk Drawing on Board – Beginner Chalk Drawing For Children