


Kids Activities
How to Make a Cute DIY Paper School Backpack

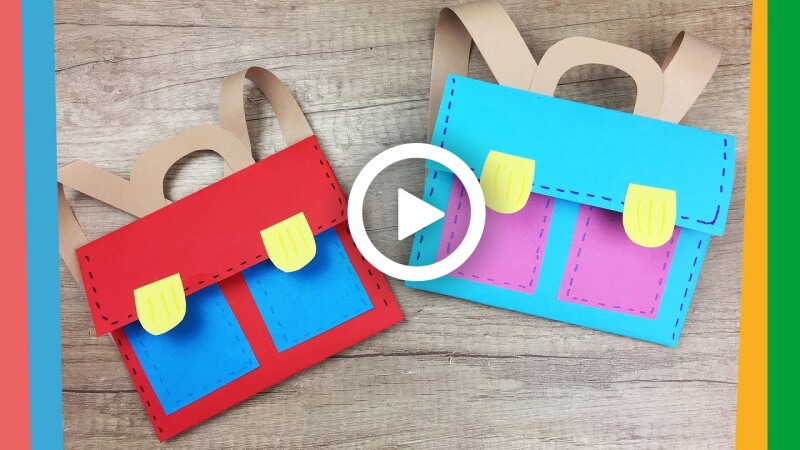
Hello readers! Today, you are going to make very cute daily stuff. You must be guessing right, as there is so much stuff that we need daily. So, let’s reveal it. This craft will be a paper backpack. Amazing right! You can put some little light stuff like a pencil, a rubber, a pen, etc. This craft will be so adorable that you will fall in love with it. So, without expending any period, let’s learn about the procedure.
How to Make a Cute DIY Paper School Backpack
Materials:
- A blue colour A4-size paper.
- Two long, brown paper strips.
- A brown colour, small square-shaped paper.
- Two yellow-colored big button shapes. (Understand the shape more properly, look at the reference video)
- Two small pink-colored rectangular papers.
- A glue stick.
- Scissors.
Procedure:
- Take a blue colour A4 size paper, place it vertically on your desk.
- Fold the bottom of the paper to the middle portion.
- Fold the top of the paper straight by leaving some space between this fold and the previous fold.
- Unfold the paper.
- A straight long rectangle area, a big breadth rectangle area, and a small square area will be made through the fold lines.
- Fold the sides of the paper by making narrow straight lines.
- Unfold the line folds.
- Cut the sides of the straight long rectangle area, by following the small rectangle fold line portion made on the corners with scissors.
- Fold the straight sides lines again.
- Apply glue over the straight line folds with a glue stick.
- Attach the bottom big breadth rectangle area over the glue part by folding it following the fold line.
- A backpack-like shape will be made.
- Fold the upper part again.
- Take two yellow colour big button shapes, attach them to the edge of the middle side portions of the upper part of the backpack with the glue stick.
- Take two rectangular pink coloured papers, place them vertically under the button portions, and attach them there with the glue stick.
- The front of the backpack will be ready.
- Turn over the backpack.
- Take a brown colour small square shape paper, cut the upper edge corners of the paper roundly with scissors.
- Cut the bottom portion roundly inside the paper by making a handle-like shape with scissors.
- Attach the handle to the middle top of the backpack with the glue stick.
- Take two long, brown coloured paper strips, attach the side tips of the papers to the bottom parts of the handle.
- Fold the other sides a little, apply glue over the fold portions, and attach them to the bottom sides of the backpack with the glue stick.
- It will be the bag’s two side handles.
- Put your pencil, eraser, and other small stuff inside the backpack.
- Your beautiful paper backpack will be ready!
It looks so cute, right? You can decorate your study desk with it. Put your stuff in them. This process is so easy and requires fewer products. You can present them to your friends; they will adore this tiny backpack. So, hurry up! Grab your stationery and make a cute paper backpack.
FAQ’s on DIY Paper School Backpack
Q1. What kind of paper do I need to make a paper school backpack?
Answer: You can use any kind of paper you have lying around. However, cardstock or heavier paper will make a sturdier backpack, so it is best to use that.
Q2. Do I need any specific tools or materials to make a paper school backpack?
Answer: You will need scissors, a glue stick, and a ruler. You can also use a pencil and a cutting mat if you have them.
Q3. How long will it take to make a paper school backpack?
Answer: It should take around 15-20 minutes, depending on your skill level.
Q4. What type of design should I use for my paper school backpack?
Answer: You can use any type of design you like. You can either use a patterned paper or create your own design with markers or stamps.
Q5. Can I make a paper school backpack that is waterproof?
Answer: No, paper is not waterproof, so the backpack will not be suitable for carrying wet items.
Q6. How do I make sure the backpack is strong enough to carry things?
Answer: Make sure you use cardstock or heavier paper for your backpack and use a stronger glue, like a hot glue gun or a stronger adhesive.
Q7. What size should I make my paper school backpack?
Answer: The size of the backpack will depend on what you’re using it for. If you’re using it for carrying textbooks, make sure it is large enough to fit them.
Q8. What kind of closure should I use for my paper school backpack?
Answer: You can use a button closure, Velcro, or even a ribbon.
Q9. Can I make a paper school backpack with straps?
Answer: Yes, you can make straps out of ribbon or fabric.
Q10. How do I make sure the backpack stays closed?
Answer: You can use a button closure, Velcro, or a ribbon. Make sure the closure is strong enough to hold the weight of the items you’re carrying in the backpack.
This cute DIY paper school backpack craft is a fun and educational activity for kids that combines creativity with learning. It is easy to make, budget-friendly, and perfect for home or classroom crafting sessions. Children will enjoy designing their own colorful mini backpack while improving important motor and artistic skills through hands-on play.
Creative fun begins here! Explore amazing crafts, educational activities, and easy DIY projects for kids by joining our Telegram and following us on YouTube & Facebook.
Read More:
- DIY How to make Paper Plate Party Hats
- DIY Magical Unicorn Kids Craft
- DIY Octopus Craft Ideas & Activities for Kids
- DIY Paper Crafts Ideas for Kids – Step By Step
- DIY Pretty Peacock Themed Crafts for Kids!


