


Kids Activities
How to Make a DIY Paper Suit Envelope for Father’s Day

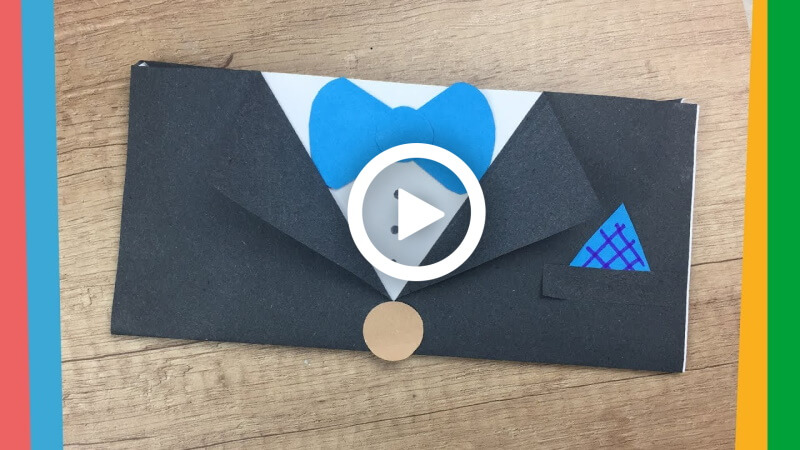
Hello, our darling readers! Let’s make a very creative craft today. We all give our loved ones cute letters and cards in envelopes. But most of the envelopes are plain and white. How about we make a suit envelope? Will it be very cool, right? So, today you’re going to make a very cool DIY Paper suit envelope for Father’s Day. We celebrate this day to celebrate the love for our Father. So, this is the best day to tell your father how much you love them. By giving a card on this envelope, you will make your father’s day with love and happiness. So, let’s get into the process!
How to Make a DIY Paper Suit Envelope for Father’s Day
Materials required:
- A black A4-size paper.
- A white A4-size paper.
- A blue colour tie-shaped paper.
- A small blue circle of paper.
- A small blue-colored triangle of paper.
- A small, brown coloured circle paper.
- Black marker pen
- A glue stick.
- Scissors.
Procedure:
- Take a black colour and a white colour, A4 size paper, and place them together vertically on the desk.
- Fold the paper from the side to the middle of the paper, leaving some space to the upper part.
- Fold the upper part over this folded paper.
- Unfold the upper part.
- Cut the top of the upper part roundly with scissors like an envelope.
- Cut the middle of the bottom black part of the envelope with scissors by making a straight line.
- Fold the paper like a collar from the cut line, like an arrow-like shape in the opposite way.
- Apply glue inside this black part and attach the white part over it with a glue stick.
- Just leave the top, roundly cut part of the envelope.
- Apply glue on the sides of the envelope and attach it with the glue stick.
- Take a blue colour bow-shaped paper and a small blue colour circle paper, attach the bow over the black collar, and put the circle in the middle of the bow with the glue stick.
- Take a small brown coloured circle paper, attach it under the collar with the glue stick.
- Cut a small, straight line shape with the rest of the black paper with scissors.
- Take a small blue colour triangle paper, attach it to one side of the black paper with the glue stick.
- Attach the small straight-line paper under the triangle with the glue stick.
- Grab a black marker pen and draw dots as the button under the blue bow.
- Draw stripes on the small triangles with the black marker.
- Put a card inside the envelope.
- Your beautiful paper envelope will be ready!
It’s amazing, right? Your dad’s gonna adore it. The effort you made will show in this craft. Most importantly, do this with your whole heart. The size of the gift doesn’t matter; the love you put into making it matters the most. This easy process can make your father so happy that you can’t believe it. So, hurry up, grab your stationery, and make a cool DIY paper suit envelope.
Creative Ideas to Customize This Paper Suit Envelope
Kids can make their paper suit envelope even more unique with these creative decoration ideas:
- Add glitter stars or stickers for a festive look.
- Use patterned paper instead of plain colored sheets.
- Draw a tiny pocket square on the suit.
- Write “Best Dad Ever” or “Happy Father’s Day” on the front.
- Attach a mini handmade tie or bow tie.
- Decorate the inside with family photos or heartfelt messages.
- Use markers, crayons, or sketch pens to create stylish suit designs.
These simple additions can turn the craft into a personalized Father’s Day gift card envelope.
Educational Benefits of This Craft Activity
This Father’s Day envelope craft is both fun and educational for children. While creating this paper craft, kids learn:
- Paper folding and cutting skills
- Hand-eye coordination
- Creative thinking
- Color matching and design balance
- Patience and focus
- DIY crafting confidence
Teachers can also include this activity in preschool and elementary school art projects during Father’s Day celebrations.
Best Paper Craft Activity for Father’s Day Celebration
If you are looking for an easy Father’s Day craft for kids, this DIY paper suit envelope is a perfect choice. It requires simple craft supplies and can be completed in a short time. Kids of all ages can enjoy making this handmade envelope to surprise their fathers with love and creativity.
This craft idea works wonderfully for:
- School craft competitions
- Greeting card activities
- DIY gift wrapping ideas
- Father’s Day classroom projects
- Weekend art and craft sessions
Tips for Making a Perfect Paper Suit Envelope
- Use thick craft paper or cardstock for better durability.
- Fold the paper carefully to keep the envelope shape neat.
- Apply glue only on the edges to avoid wrinkles.
- Let the glue dry completely before inserting cards or notes.
- Use contrasting colors for the tie and collar to make the design stand out.
Why Handmade Father’s Day Crafts Are Special
Handmade Father’s Day crafts are a beautiful way for kids to express their love, creativity, and appreciation. A DIY paper suit envelope is not only easy to make, but it also becomes a memorable keepsake for fathers. Children can add handmade notes, drawings, small surprise messages, or gift cards inside the envelope to make it even more personal.
Craft activities like this also help improve fine motor skills, paper-folding techniques, creativity, and concentration in kids. Parents and teachers can use this simple craft idea at home, in classrooms, or during Father’s Day activity sessions.
FAQs on DIY Paper Suit Envelope for Father’s Day
Q1. What supplies do I need to make a DIY paper suit envelope for Father’s Day?
Answer: You will need a piece of cardstock, a pair of scissors, a ruler, a pencil, double-sided tape, and a printer with ink.
Q2. What size paper should I use to make my paper suit envelope?
Answer: For a standard-size envelope, you should use a piece of cardstock that is 8.5 x 11 inches.
Q3. How do I measure and cut the cardstock for the envelope?
Answer: Using a ruler, measure and mark out a rectangle that is 8 x 5 inches. Cut out the rectangle using scissors.
Q4. How do I fold the cardstock to make the envelope?
Answer: Fold the longer sides of the rectangle inwards, so that they overlap in the middle. Then fold the top and bottom of the rectangle inwards, so that they meet in the middle. Secure the sides together with double-sided tape.
Q5. How do I make the pocket for the envelope?
Answer: Measure and mark out a rectangle that is 1.5 x 4 inches on one of the sides of the envelope. Cut out the rectangle and fold it inwards to create the pocket. Secure the pocket with double-sided tape.
Q6. How do I decorate the envelope?
Answer: You can decorate the envelope using markers, colored pencils, or stickers. You can also print out a design, such as a picture of a suit, and glue it onto the envelope.
Q7. How do I add a message inside the envelope?
Answer: You can handwrite a message on a piece of paper and place it inside the pocket of the envelope.
Q8. How do I seal the envelope?
Answer: You can use double-sided tape to seal the envelope.
Q9. How do I create an envelope flap?
Answer: Measure and mark out a rectangle that is 1 x 4 inches on one of the sides of the envelope. Cut out the rectangle and fold it inwards to create the envelope flap. Secure the flap with double-sided tape.
Q10. How do I give the envelope to my dad?
Answer: You can give the envelope to your dad on Father’s Day or attach it to a gift.
This DIY Paper Suit Envelope for Father’s Day is a fun, creative, and meaningful craft activity for kids. It is simple to make, budget-friendly, and perfect for creating beautiful memories with family. Handmade gifts always carry emotional value, and this adorable suit envelope is a wonderful way for children to show love and appreciation for their dads on Father’s Day.
Let kids learn, create, and have fun with exciting crafts and activities! Join our Telegram family and follow us on YouTube & Facebook today.
Read More:
- DIY Magical Unicorn Kids Craft
- DIY Octopus Craft Ideas & Activities for Kids
- DIY Paper Crafts Ideas for Kids – Step By Step
- DIY Pretty Peacock Themed Crafts for Kids!
- DIY Recycled Magazine Bangle Ideas


