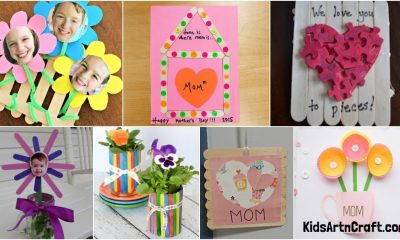
Mother’s Day
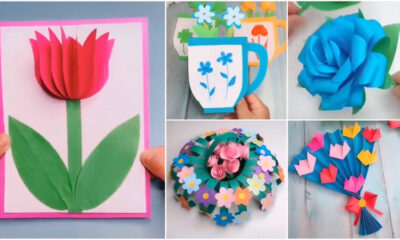
How to Make a Cute Paper Flower Card for Mother’s Day

Hello guys! Today, like always, we came up with some great craft ideas that must give energy in your mind, and as you might know, the craft is very good medicine to remove stress and tension, fulfil your wish to do something new and creative. Today’s craft is a gift card for Mother’s Day.
Our mothers are the most important and precious people in our lives. The sacrifices they made for us will never be repaid by us. Mother’s Day is the perfect day to show your love, respect and gratitude to your mom. As we know, you love your mother more than anything. This card will be so cute and lovely, and your mother will. This card is something so little to do for your mother, but your effort will make her more than happy. Amazing right! So, without wasting any time, let’s get started with the process!
Why Handmade Flower Cards Are Perfect for Mother’s Day
Handmade flower cards are one of the most meaningful gifts children can create for Mother’s Day. A cute paper flower card allows kids to express love, appreciation, and creativity through a simple DIY craft activity. Mothers treasure handmade greeting cards because they carry personal emotions and thoughtful effort from children. (kidsartncraft.com)
This easy Mother’s Day paper flower craft is ideal for preschoolers, kindergarten kids, and elementary students. It can be used for classroom activities, homeschooling projects, art competitions, and holiday craft sessions.
How to Make a Cute Paper Flower Card for Mother’s Day
Materials:
- A blue-coloured rectangular paper with a small length and a long breadth.
- A purple-coloured paper.
- A big yellow coloured paper.
- A brown piece of paper.
- A big green paper.
- A white paper.
- A black marker pen.
- Colour sketch pens/ markers.
- A glue stick.
- Scissors.
Procedure:
- Take a blue-coloured rectangular paper with a small length and a long breadth.
- Put the rectangular paper straight on your desk.
- Fold the paper in half from right to left.
- Draw two curved lines from the bottom sides to the middle side, like a flower pot with a pencil.
- Cut out the drawing lines.
- A flower pot with two slides will be ready.
- It will be the card base.
- Take a purple coloured paper, cut out four circles of the same size from it with scissors.
- Take a yellow coloured paper, cut out two circles of the same size from it with scissors.
- Take a green coloured paper, cut out a straight stem-like shape from it with scissors.
- Take a yellow colour circle, apply glue on its sides and attach the purple circles on the sides, covering the yellow circle like a flower with the glue stick.
- Take the green colour stem and attach it to the bottom middle of the flower with the glue stick.
- Take the other yellow circle and attach it to the middle of the purple circles with the glue stick.
- A flower will be ready.
- Turn over the circle.
- Attach the flower to the top middle of a flower pot card base side with the glue stick.
- Take the green colour paler, cut out two big leaf shapes with scissors.
- Attach the leaves under the sides of the flower and on the card base with the glue stick.
- Take a small brown coloured rectangle piece of paper, attach it under the leaves with the glue stick.
- Remember, a little brown portion should be seen after folding the card.
- Take the yellow coloured paper, cut out a small square shape as a message writing portion with scissors.
- Write a heartwarming message on it.
- Attach the shape under the brown paper with the glue stick.
- Fold the card.
- Take a white paper, draw two small circles of the same size on it and then draw cute eyeballs on it with a black marker pen.
- Cut out the circles and attach them in the middle of the yellow circle of the flower.
- Grab some coloured markers, draw a smile and a nose on the yellow portion.
- Your cute Mother’s Day flower gift card will be ready!
P.S- Use different coloured paper if you don’t have these colours as per your help.
Look how adorable it looks! It’s the best way to wish your mother a ‘ Happy Mother’s Day. Your message on this card will make your mother very happy. More importantly, your effort and hard work will definitely melt your mother’s heart. As you can see, the process is so easy and requires fewer materials that you can easily make it. Make many of these by using different colours and sizes of paper. Use your sense of creativity and highlight them. The flower can be in any shape. Hurry up, grab your stationery and let’s make a beautiful paper flower gift card.
Educational Benefits of Paper Flower Card Crafts
Creating handmade greeting cards offers several developmental benefits for children, such as:
- Improves fine motor skills and hand coordination
- Encourages creativity and imagination
- Enhances colour recognition and design skills
- Builds patience and concentration
- Promotes emotional expression through art
- Strengthens parent-child bonding during craft activities
Hands-on paper craft activities are also recommended for improving early childhood learning and creative thinking.
Materials Required for Flower Card Craft
This adorable paper flower card can be made using simple and affordable craft supplies:
- Colored craft paper or cardstock
- Scissors
- Glue stick
- Pencil and eraser
- Sketch pens or markers
- Decorative stickers or glitter
- Ribbon or lace (optional)
- Crayons or colored pencils
Using recycled craft paper can also make this activity eco-friendly and budget-friendly for schools and parents.
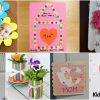
Creative Ideas to Decorate Your Mother’s Day Card
Kids can personalise their flower greeting card with creative decorations like:
- Adding glitter to flower petals
- Creating 3D layered flowers
- Using patterned or textured paper
- Writing a heartfelt message inside
- Decorating with hearts, butterflies, and stars
- Adding paper leaves and ribbons
These small decorative details make the handmade card more beautiful and memorable for mothers and family members.
Why DIY Greeting Cards Are Better Than Store-Bought Cards
DIY Mother’s Day cards are more special because they are handmade with love and creativity. Unlike ready-made greeting cards, handmade flower cards help children:
- Show personal emotions
- Develop artistic confidence
- Create unique gift ideas
- Spend quality family craft time
- Learn the value of handmade gifts
Personalised cards often become treasured keepsakes that mothers save for many years.
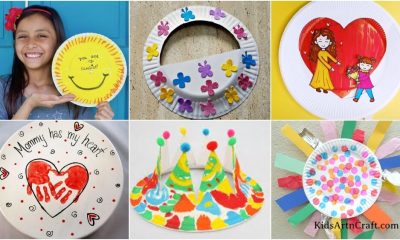
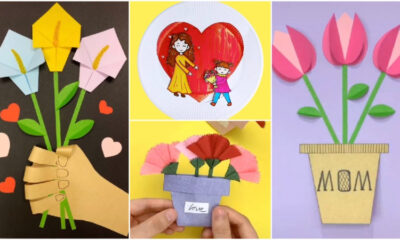
Best Occasions to Use Flower Greeting Cards
This cute paper flower card is suitable for many celebrations and special moments, including:
- Mother’s Day
- Birthday wishes
- Teacher Appreciation Day
- Friendship Day
- Thank You cards
- Valentine’s Day
- Grandparents’ Day
Children can customise the colours, messages, and decorations according to the occasion.
FAQ’s on How to Make a Cute Paper Flower Card for Mother’s Day
Q1. What materials do I need to make a paper flower card for Mother’s Day?
Answer: You will need construction paper, scissors, glue, and a pen or marker. You may also want to add additional decorations, such as ribbon, glitter, or sequins.
Q2. How do I make the paper flower?
Answer: Cut several petal shapes out of construction paper. You can make them any size you want, but make sure they are all the same size. Glue the petals together, overlapping them slightly. Once the petals are all glued together, glue the flower onto the centre of the card.
Q3. How do I make the card?
Answer: Start by cutting a piece of construction paper to the size you want your card to be. Fold the paper in half. Then, write a message to your mom on the inside of the card. You can also decorate the card by adding ribbon, glitter, or sequins.
Q4. What kind of message should I write for my mom?
Answer: You can write anything you want! Some ideas include “Happy Mother’s Day,” “I love you, Mom!” or “Mom, thank you for everything you do.”
Q5. Can I use other materials to make the card?
Answer: Absolutely! You can use other craft supplies, such as buttons, fabric, or stickers, to decorate your card and make it unique.
Q6. Can I give the card to anyone else besides my mom?
Answer: Yes, you can give the card to any special person in your life.
Q7. How should I store the card after I make it?
Answer: You can store the card in a sealed plastic bag or a cardboard box. This will help keep it safe and make sure it lasts a long time.
Q8. Do I need to use a special type of paper for this project?
Answer: You can use any type of paper you like, such as construction paper, cardstock, or even plain printer paper.
Q9. How long will it take to make the card?
Answer: The time it takes to make the card will vary depending on the size and complexity of your card. Generally, it will take about 30 minutes to make a basic card.
Q10. What can I do with the card once I’m finished?
Answer: You can give the card to your mom or someone else special to you. You can also keep it as a special memento.
This cute paper flower card for Mother’s Day is a fun, creative, and meaningful craft activity for kids. It encourages artistic expression, emotional connection, and hands-on learning while creating a beautiful handmade gift for mothers. Whether made at home or in school, this DIY flower greeting card becomes a memorable keepsake filled with love and creativity. Try this easy paper flower card craft with your kids and make Mother’s Day extra special.
Helping kids learn creatively with fun crafts and exciting hands-on activities every day! Join our Telegram family and follow us on YouTube & Facebook
Reviewed by Yash Sharma
Read More:
- DIY Mother’s Day Cards
- Easy to make Mother’s Day Card Idea
- Mother’s Day Gift Ideas
- Paper Flower Idea – Easy and quick craft, great for Mother’s Day
- Easy to make Mother’s Day Card Idea