


Paper Crafts
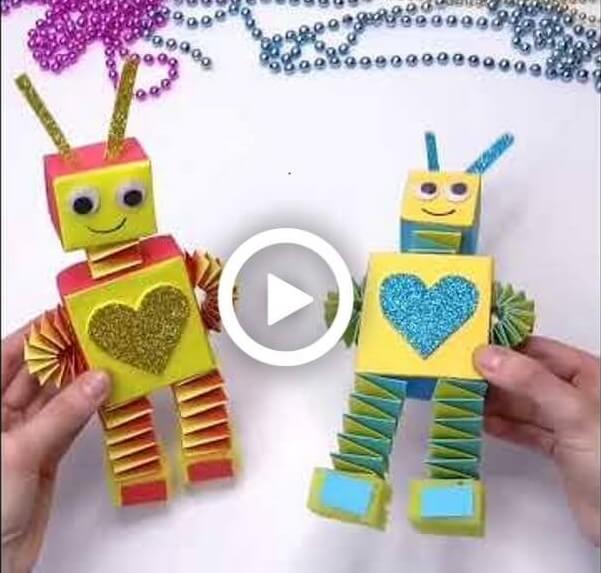
How to Make A Moving Paper Toy – Robot

Let’s make something innovative today! What could you make? Today you’re getting to make a paper robot! Kids are fascinated by robots, you know. During this age of Avengers and Justice League, kids are learning a lot about robots and technology and loving them. So, why not make them more creative by it? They’re going to find immense joy in it. So, without dalliance, grab your stationery and make an unusual moving toy.
How to Make A Moving Paper Toy – Robot
Materials:
- Four 5*30 cm color paper strips
- Four 3*30 cm color paper strips
- Two 5*13 cm color paper strips
- A glitter paper
- One washing sponge
- A pair of scissors
- A glue stick
- A glue gun
- Eye-shaped beads
- A black marker.
Procedure:
- Take two 5*30 cm color paper strips, apply glue on the tip of 1 and stick the opposite strip, and fold them one after another in a crisscross pattern to form the specified design. Then, again, secure the ends with glue and repeat an equivalent step to make another one like this.
- Take two 3*30 cm color paper strips, apply glue on the tip of 1 and, and stick the opposite strip and fold it one after another in a crisscross pattern to form the specified design. Then, secure the ends with glue and repeat the same step to make another one like this.
- Take a dishwashing sponge, cut a rectangle of dimensions 3*9 cm, and we will use the remainder of the larger rectangular part for the body.
- Use colored paper to wrap the larger sponge for the body, for wrapping fold thin rectangular strips all around the paper, and cut out tiny triangular structures on the sides as shown. This may help in wrapping. Now, place the sponge and wrap it with the assistance of the colored paper and glue.
- Take an oblong strip of another color of the same width as the washing sponge and wrap it with glue as shown. Wrap the sponge piece cut for creating the hand in a similar fashion to that of the body, and wrap another colored strip all around it.
- Take two 5*13 cm color paper strips, apply glue on the tip of 1 and, and stick the opposite strip and fold it one after another in a crisscross pattern to make the specified design, then again secure the ends with glue.
- Using a glue gun, paste the top with the 5*13 cm zig-zag, then again, the 5*13 cm zig-zag to the body, and now paste the arms and the legs.
- Cut the left-out sponge into two equal pieces to style the feet and paste an equivalent using the glue gun.
- Cut two small rectangular bits of paper to hide the foot portion.
- Stick the 2 eye-shaped beads with glue.
- Cut two thin strips and a heart shape from glitter paper, stick the skinny rectangular strips as antennas, and place the heart within the body.
- For the ultimate touch, add a smile with a black marker pen.
Your toy is prepared to move! Kids will certainly enjoy twiddling with an equivalent. You’ll exhibit this craft in any exhibition also. You’ll also improvise an equivalent and make it quirkier by adding more hands or detailing the antennas as you would like. So, hurry up and obtain your hands on your personalized robot and luxuriate in it.
Materials Needed for Paper Robot Craft
- Colored paper or cardstock
- Glue stick and glue gun
- Scissors
- Sponge pieces
- Black marker
- Decorative glitter paper
- Googly eyes or beads
- Pencil and ruler
Using simple craft supplies makes this paper robot activity easy and budget-friendly for parents and teachers. (kidsartncraft.com )
Educational Benefits of Robot Crafts for Kids
Interactive paper crafts help children build important developmental and creative skills. This moving robot craft can improve:
- Fine motor skills
- Hand-eye coordination
- Folding and cutting accuracy
- Creativity and imagination
- Problem-solving abilities
- Focus and patience
- Basic STEM and engineering understanding
Hands-on robot projects also encourage children to explore movement, structure, and simple mechanical concepts through play-based learning. Research on paper robot building activities highlights their educational and creative value for children.
Fun Ways to Use the Moving Paper Robot
Kids can enjoy this DIY robot craft in many creative ways:
- Pretend play and storytelling
- School science or craft exhibitions
- Robot-themed birthday decorations
- STEM learning activities
- Classroom display projects
- DIY toy collections
Children can also customize their robots with different colors, extra arms, antennas, stickers, or funny facial expressions to create unique designs.
Tips for Better Craft Results
- Use thick paper or cardstock for stronger robot parts
- Fold paper carefully to create smooth-moving sections
- Decorate the robot using metallic colors or glitter paper
- Younger children may need adult supervision while using scissors or glue guns
- Allow the glue to dry completely before moving the toy
Why Interactive Paper Crafts Are Great for Learning
Interactive paper toys are more engaging than regular crafts because children can play with them after making them. Activities like moving robots encourage imagination, storytelling, and creative experimentation while keeping kids away from excessive screen time.
DIY paper toy projects also help children understand how simple structures and folding techniques can create movement in handmade crafts.
Why Kids Love This Moving Paper Robot Craft
This Moving Paper Toy Robot craft is an exciting DIY activity that combines creativity with motion. Kids enjoy making robots because they can play with them after completing the craft. The moving arms and legs make the robot interactive and entertaining, which keeps children engaged for longer periods.
Robot-themed crafts are especially popular among children who love science fiction, technology, and creative toys. This activity is perfect for school cra
FAQs on How to Make A Moving Paper Toy – Robot
Q1. What materials do I need to make a moving paper toy robot?
Answer: You will need paper, scissors, glue, a pencil, a ruler, and a toothpick to make a moving paper toy robot.
Q2. What steps do I need to take to construct the robot?
Answer: First, draw and cut out the robot parts from paper. Then, glue the parts together to form a complete robot shape. Finally, attach the toothpick to the robot’s body and make sure it can move up and down.
Q3. How do I attach the toothpick to the robot?
Answer: Use glue to attach the toothpick to the robot’s body. Make sure the toothpick is firmly attached so that it can move freely.
Q4. Can I use a different type of paper instead of plain white paper?
Answer: Yes, you can use a variety of papers, such as colored construction paper, poster board, or cardstock.
Q5. What type of glue should I use to attach the parts?
Answer: Any type of glue that is suitable for paper will work. White glue, school glue, or a glue stick are all suitable options.
Q6. How do I make sure the robot is stable?
Answer: Make sure the robot’s parts are securely glued together. Also, make sure the toothpick is firmly attached to the body and is free to move up and down.
Q7. How big should the robot be?
Answer: The size of the robot will depend on how big you make the individual parts. Generally, the robot should be between 4 and 6 inches tall.
Q8. What other materials can I use to decorate the robot?
Answer: You can use markers, stickers, paint, glitter, or other craft materials to decorate your robot.
Q9. What age group is this project suitable for?
Answer: This project is suitable for children ages 5 and up. Younger children may need assistance from an adult.
Q10. Can I make more than one robot?
Answer: Yes, you can make as many robots as you like. Feel free to experiment with different designs and paper materials to make unique robots.
This Moving Paper Toy Robot craft is a fun and educational DIY activity for kids who love creative toys and robot-themed projects. It combines crafting, movement, and imaginative play in one engaging activity. Whether used for school projects, STEM learning, or home craft time, this paper robot is sure to entertain children while helping them develop important creative and motor skills.
Read More:
- How to Make a Flying Paper Butterfly
- How to Make a Paper Dinosaur – Step-by-Step Instructions
- How to Make a Paper Whale
- How to Make an Explosion Box – DIY Paper Crafts
- How to Make Easy Paper Animal Crafts For Kids


