


Paper Crafts
How to Make A Paper Toy Peacock

Ready to do something coloring today! You are going to make the most colorful bird. Do you guess it? Right, Peacock! Peacocks are the most beautiful and colorful birds. They are called the ‘Rain birds,’ and kids always have fun watching them. These birds are kind of rare, so you can’t watch them everywhere, so why not make one of them? So let’s know the process!
How to Make A Paper Toy Peacock
Materials:
- A 20* 20 cm page color paper. You can also choose any measurement of the page according to the size of your peacock.
- A colored paper strip. (It will be used for the beak of the peacock, so choose the color accordingly)
- A 2*16 cm color paper.
- A 20*20 cm. color paper. (It will be used for the feathers of the peacock, so you can take the paper according to the size.)
- A pencil & career.
- A glitter paper.
- A scissor.
- Color markers or pastel/watercolor.
- A black marker pen.
Procedure:
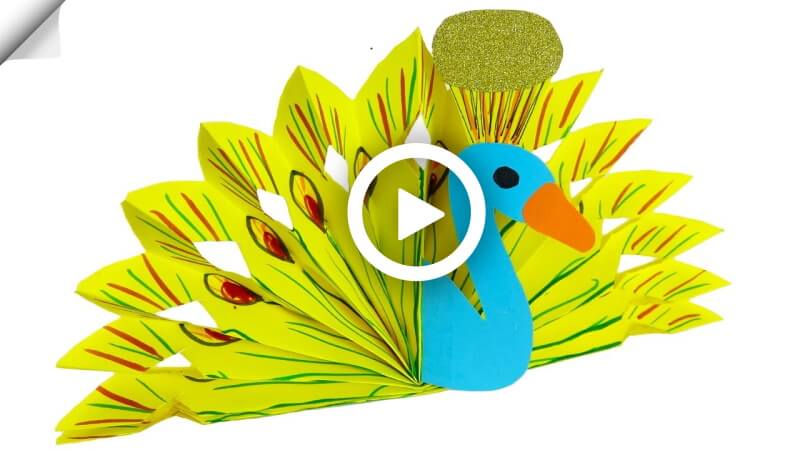
- Take a 20*20 cm piece of paper, draw a duck-like figure on it with a pencil. Overdo the lines of it with a black marker and cut it out. It will be the body of the peacock.
- Take a colored paper strip, and draw a peacock’s beak with a pencil. Overdo the pencil lines with a black marker. Fold the strip into a rectangular shape, and place it on the mouth of the previous paper. Notify the location of the beak, then cut it out.
- Stuck both cut pieces of the beak over and under the peacock’s body in the mouth area.
- Take a 2*16 cm. color paper, place it over the peacock’s body. Draw two lines on the page and some lines in the middle of them. It will be the crown-like strips of the peacock’s head, draw it, like that. Use color markers to highlight them. Then cut it out. And highlight it on the other side.
- Take the piece and stick it over the peacock’s head.
- Take the glitter page, fold it, and cut it into a small oval shape. Then take the glitter page pieces and stick them on the crown-like strips of the peacock.
- Draw the eyes of the peacock with the black marker.
- Take a 20*20cm. paper that is folded upside down in a rectangular shape, then folded sideways. Then fold it over two times. It will look like a strip.
- Fold the paper from over and under in a rectangular shape.
- Unfold the paper, there will be many straight fold lines over it, follow the lines and fold it over and under by following the fold lines. It will look like a strip.
- Take the paper straight and fold it by making a small rectangle.
- Cut the upper edge of the paper from right to left in a triangle shape, then make small triangles in the middle of it, and then unfold the paper.
- Highlighted the paper with color or markers. Make an identical peacock feather.
- Take the page from the bottom, roundly stick the glue, and place the peacock’s body in the middle.
- Stick the glue to attach the feathers.
- Give a final touch by highlighting the piece.
P.s- You have to draw the peacock’s body on it, so choose the color accordingly.
Your peacock is ready to dance! This origami experience will make every kid so happy. You can use them to decorate your house and stuff. Be more creative and make them as beautiful as you can. So, without wasting any time, hurry up and make your own precious bird!
Benefits of Making a Paper Toy Peacock Craft
Creating a paper toy peacock is not only fun but also educational for children. This colorful bird craft helps kids improve their fine motor skills, hand-eye coordination, and creativity while working with paper, glue, and scissors. Peacock crafts also introduce children to birds, nature, and vibrant color combinations in an interactive way.
This activity is perfect for preschoolers, kindergarten kids, and primary school students because it encourages imaginative play and boosts concentration. Parents and teachers can use this easy paper craft during classroom activities, art sessions, rainy-day fun, or holiday projects.
Materials You Can Use for Decoration
To make your paper toy peacock look more attractive, kids can decorate it using:
- Glitter paper
- Googly eyes
- Colorful craft feathers
- Sketch pens and crayons
- Sequins and stickers
- Watercolors or acrylic paints
- Patterned origami sheets
Using different decorative materials helps children explore textures, colors, and creative design ideas.
Safety Tips for Kids’ Craft Activities
Adult supervision is recommended while using scissors, glue guns, or sharp craft tools. Always use child-safe scissors and non-toxic glue for younger children. Keep the crafting area clean and organized to avoid losing small decorative items.
Educational Value of Peacock Crafts
Peacock-themed crafts are a great way to teach children about the national bird of India and its beautiful feathers and colors. These activities can also be combined with storytelling, bird learning lessons, or nature-themed classroom projects. Peacock crafts encourage observation skills and artistic expression in a fun way.
Easy Tips to Make Your Paper Peacock Look Realistic
- Use bright blue, green, and golden shades for a vibrant appearance.
- Add layered paper feathers for a 3D effect.
- Draw detailed feather patterns using markers.
- Fold the tail in a fan shape to create a realistic peacock look.
- Use shiny craft paper to make the design more eye-catching.
FAQ’s on How to Make A Paper Toy Peacock
Q1. What materials do I need to make a paper toy peacock?
Answer: You will need several sheets of origami paper, scissors, glue, a ruler, and a pencil.
Q2. Is it difficult to make a paper toy peacock?
Answer: No, a paper toy peacock is fairly easy to make, and the steps are quite straightforward.
Q3. How long will it take to make a paper toy peacock?
Answer: It should take you approximately 30 minutes to complete the project.
Q4. What are the steps to make a paper toy peacock?
Answer: Step 1: Cut out a circle from the origami paper. Step 2: Cut out strips of the paper to make the peacock’s plumage. Step 3: Glue the strips onto the circle to form the peacock’s body. Step 4: Draw a beak, eyes, and tail feathers. Step 5: Cut out the beak, eyes, and tail feathers. Step 6: Glue the beak, eyes, and tail feathers onto the paper circle.
Q5. Do I need any special tools to make a paper toy peacock?
Answer: No special tools are needed, only the materials listed above.
Q6. What size should I make the paper toy peacock?
Answer: The size of your paper toy peacock will depend on the size of the origami paper you use.
Q7. Do I need to use a specific type of paper for this project?
Answer: Yes, origami paper is best for making paper toy peacocks.
Q8. Can I use any colors of origami paper?
Answer: Yes, you can use any colors of origami paper that you like.
Q9. Can I make a paper toy peacock with other materials?
Answer: Yes, you can also make a paper toy peacock with felt, fabric, or other craft materials.
Q10. Are there any tips for making a paper toy peacock?
Answer: Yes, be sure to measure and cut carefully, and use a glue stick to glue the pieces together.
This paper toy peacock craft is a fun and creative activity that helps children learn while enjoying art and craft time. With simple materials and colorful decorations, kids can create a beautiful peacock toy that enhances creativity, imagination, and crafting confidence. Try this easy DIY paper bird craft at home or in the classroom and let kids joyfully explore their artistic skills.
Inspire creativity and learning with exciting kids’ crafts and activities! Stay connected through Telegram, YouTube & Facebook
Reviewed By Rachit Gupta
Read More:
- 22 DIY Friendship Bracelets for Kids
- DIY How to make Paper Plate Party Hats
- DIY Toys for Kids – Perfect Gift Ideas
- Funny Balloon Faces Craft for kids
- How to Decorate a Party with Paper Crafts


