


Kids Activities
How to Make An Easy Paper Rabbit

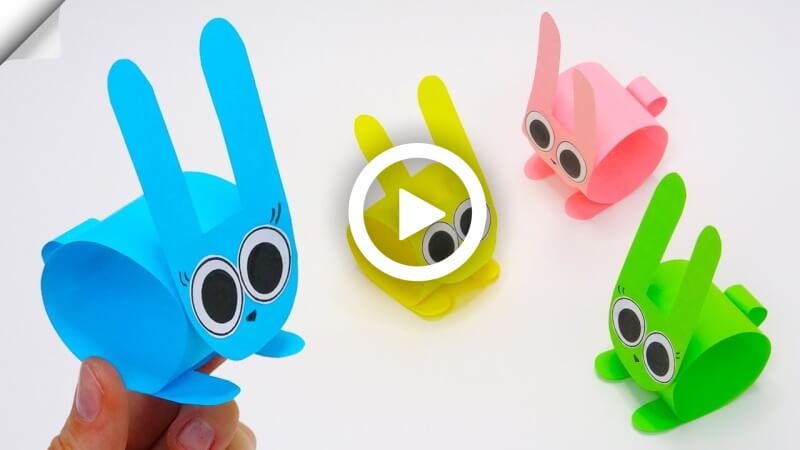
It’s Bunny Time! today you are going to learn to make a paper rabbit. All kids might hear the fables about rabbits, so they can easily connect to these animals. Kids are also kind rabbits cute and playful. That they will be overwhelmed to have a bunny pet. If you can’t give them a real bunny then give them these. They will be so happy and have fun. So let’s grab your materials and make a cute bunny by yourself!
How to Make an Easy Paper Rabbit
Materials:
- A 4.5* 30 c.m. color paper.
- A white page. ( Any size. You have to draw the rabbit’s eyes here. So take it accordingly.)
- A Scissor.
- A Glue stick.
- A Centimeter scale.
- A pencil.
- A Scale with round shapes on it.
- A black marker pen.
Procedure:
- Take a 4.5 * 30 c.m. color paper, Cut it with a scissor into two pieces. The size of both paper pieces will be 10c.m and 20cm.
- Take the 20c.m piece, mark the upper part of it with a pencil. Take a centimeter-scale and make two points, 1.5c.m and 3c.m. over it accordingly. Then take the scale and make a marked side-wise, the size will be 2c.m from the upper side.
- Cut the marks with the scissor from the middle by making a small square. Then cut the edges of the long both sides. It will be the legs of your rabbit.
- Stick the glue stick under the piece and roll it and attach it by leaving the small legs.
- Take the 10 c.m pieces, make two marks with the scale of 3.5c.m in the middle. The marks should be added sidewise. Then in the above of the marks and the page make two marks 1.5c.m and 3 c.m.
- Use the pencil to attach the points up to down. Then cut the middle portion of it. Then roundly cut the edges of the sides. It will be the long bunny ears.
- Roundly cut the bottom of the 10 c.m pieces. It will become a bunny face.
- Take a white page and a scale with round shapes on it, Use the scale and make two big cute bunny eyes and eyeballs. And color the eyeballs with the black marker pen.
- Cut the eyes out with a scissor and attach them with the glue stick on the face of the rabbit. Then make a cute smile and eyelash of the rabbit with the black marker pen.
- The rabbit face is ready.
- Attach the face with the body with the glue stick.
- Then take the middle page cut from the 10c.m piece and roll it within your one finger and attach it to the body of the rabbit with the glue stick. It will be the tail of your rabbit.
Who eats the carrots huh!! Jokes apart! your cute rabbit is ready to play. as you can see this process will require very less amount, materials. Your child and you can make them as many as you want. Use various facial expressions on them and can make them funny and cute at the same them. Impress your teacher, parents, and friends with them. Decorate your house and stuff with them. So, without wasting any time let’s make them! How about a race after that! Hurry up!
FAQ’s on How to Make An Easy Paper Rabbit
1. What materials do I need to make a paper rabbit?
Answer: You will need paper, scissors, glue, and a pencil.
2. How do I create the rabbit’s body?
Answer: Trace a large circle on the paper using a pencil. Cut out the circle and fold it in half. Then, cut out two small circles for the ears and glue them to the top of the folded circle.
3. How do I make the rabbit’s face?
Answer: Draw two small eyes and a nose on the front of the rabbit’s face using the pencil. Then cut two small circles for the cheeks and glue them to the face.
4. How do I make the legs and arms?
Answer: Cut out four small strips of paper and glue them to the sides of the body. Then, fold them in half and glue the ends together to create the arms and legs.
5. How do I make the rabbit’s tail?
Answer: Cut out a small triangle shape and glue it to the back side of the body.
6. How do I make the rabbit’s ears?
Answer: Cut out two small triangles and glue them to the top of the ears.
7. How do I make the rabbit’s whiskers?
Answer: Cut out two small strips of paper and glue them to the sides of the nose.
8. How do I make the rabbit’s feet?
Answer: Cut out two small circles and glue them to the bottom of the legs.
9. How should I finish my paper rabbit?
Answer: You can add small details such as stripes or spots to the rabbit’s back. You can also draw a small heart shape on the rabbit’s chest.
10. What other things can I make with paper?
Answer: You can make many other things with paper, such as animals, flowers, trees, and houses.
Read More:
- How to Make an Origami Elephant
- How to Make Paper Rabbit – Step by Step Instructions
- How to Make Paper Aquarium Fish Step by Step Instructions Easy Tutorial
- How to cut a circle of paper hearts – Step by Step Instructions
- How to make a Paper Butterfly – DIY Folding Butterfly – Paper Craft