


Paper Crafts
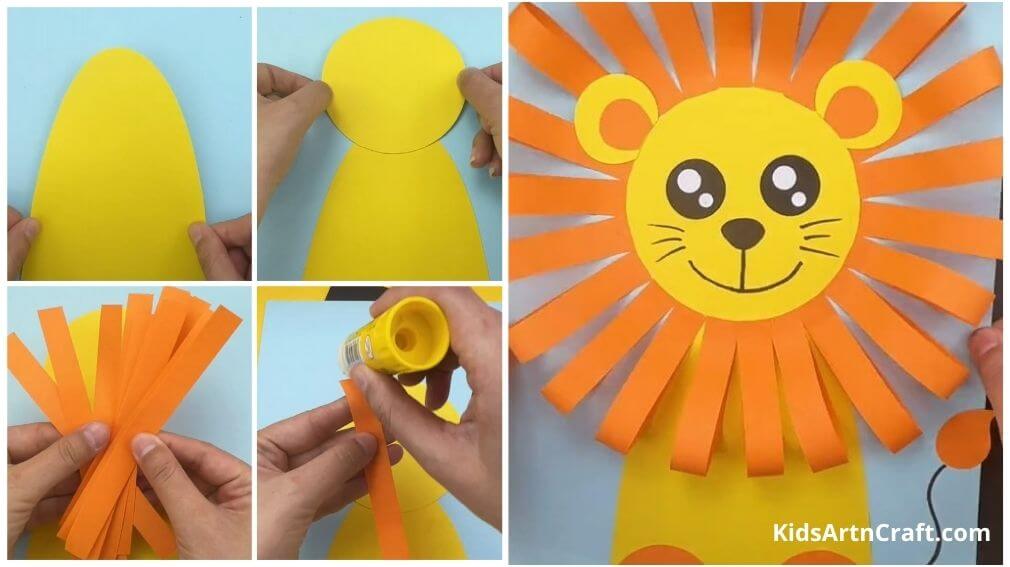
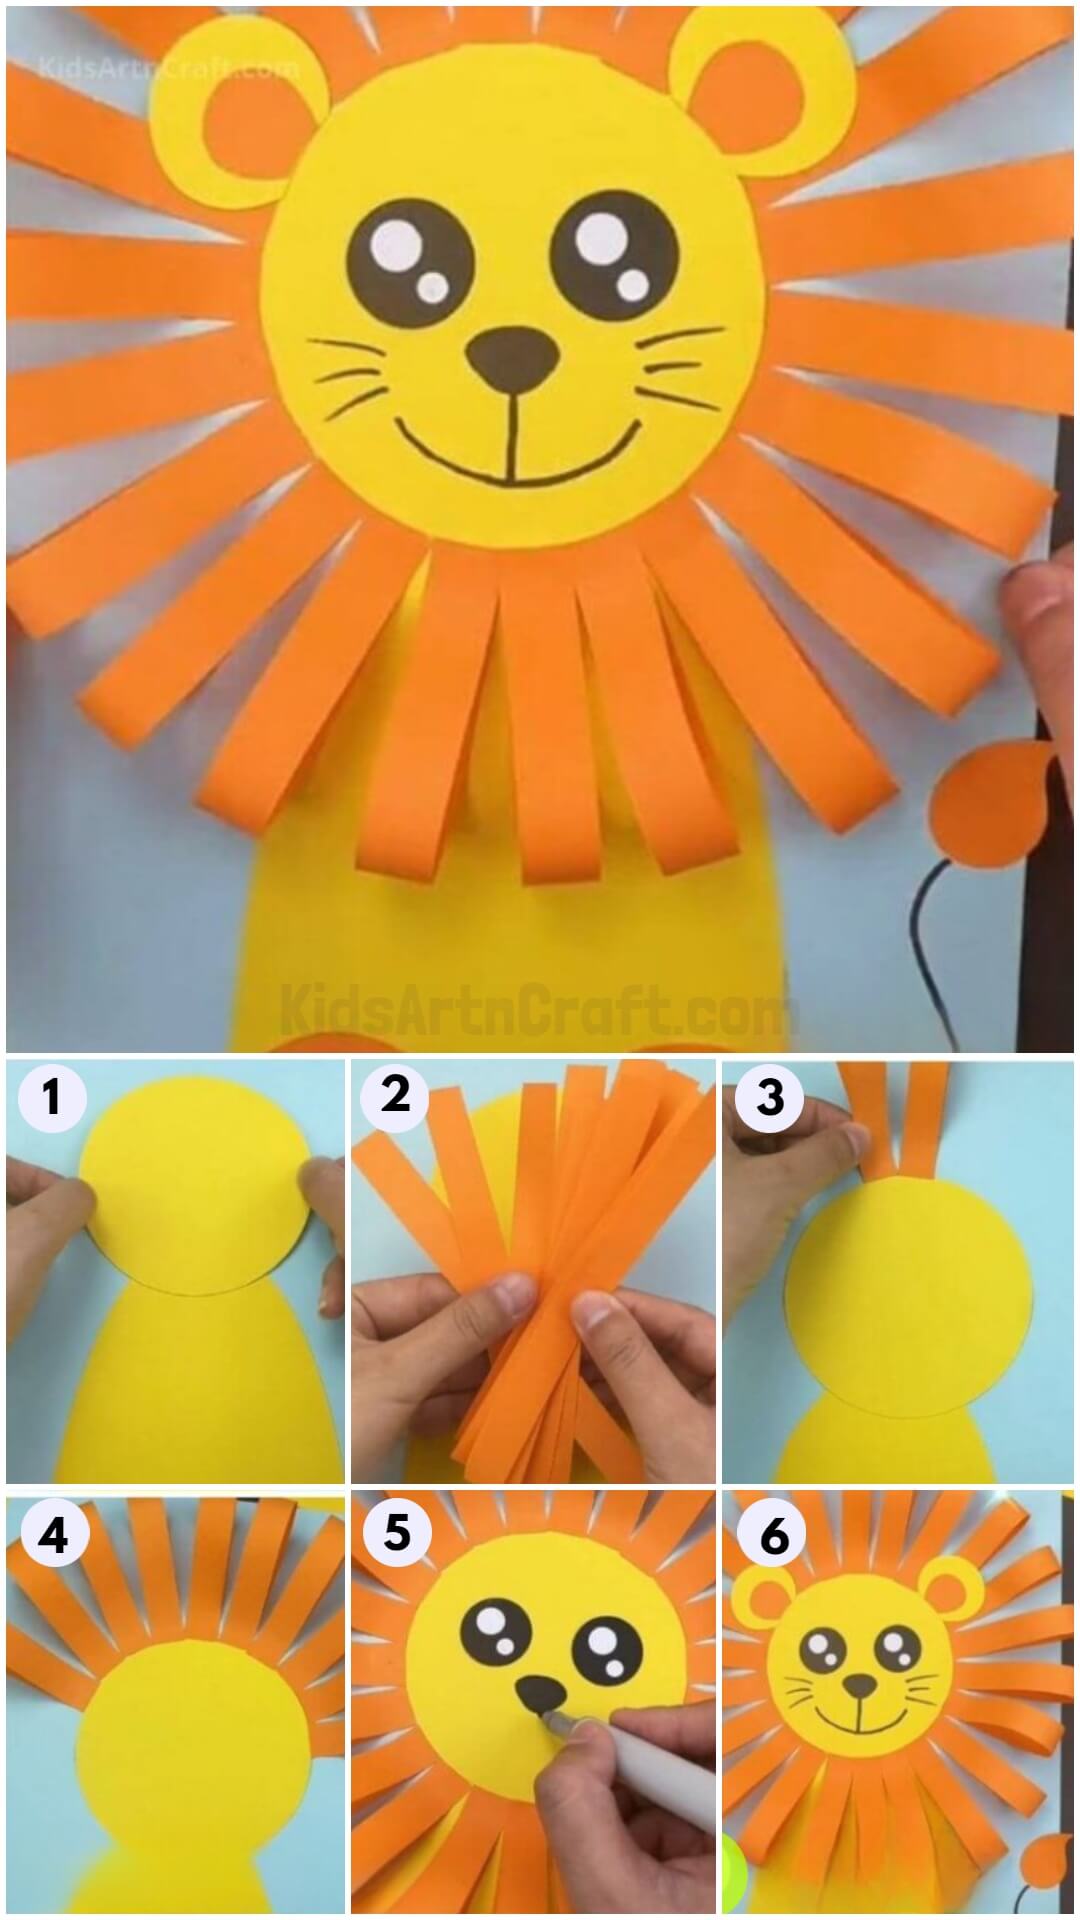
How to Make Paper Lion Craft – Step by Step Instructions

A Roar to Paper Lion! You will learn how to make a paper lion craft with easy step-by-step tutorials. Hope our instructions will be useful!
As we all know, A Lion is the king of the jungle. It looks so majestic because of the fur around its face. No animal would dare to stand up against a lion because of its might and ferociousness. Lions are the only animal which is not scared of any other animals. It has a raw strength and power that no other animal possesses. It is a large cat belonging to the Genus Panthera, which is native to Africa and India.
How to Make a Paper Lion Craft – Step-by-Step Instructions
Materials Required:
- A sheet of plain paper of your choice
- Yellow paper
- Orange long strips/orange paper
- Black paper
- Black marker
- Scissors
- Pencil
- Eraser
- Glue
- Brown sketch pen
Instructions:
Let’s get started!
STEP 1 – PLAIN PAPER
Take the sheet of plain paper and place it on a steady surface. This is where we will stick the lion.
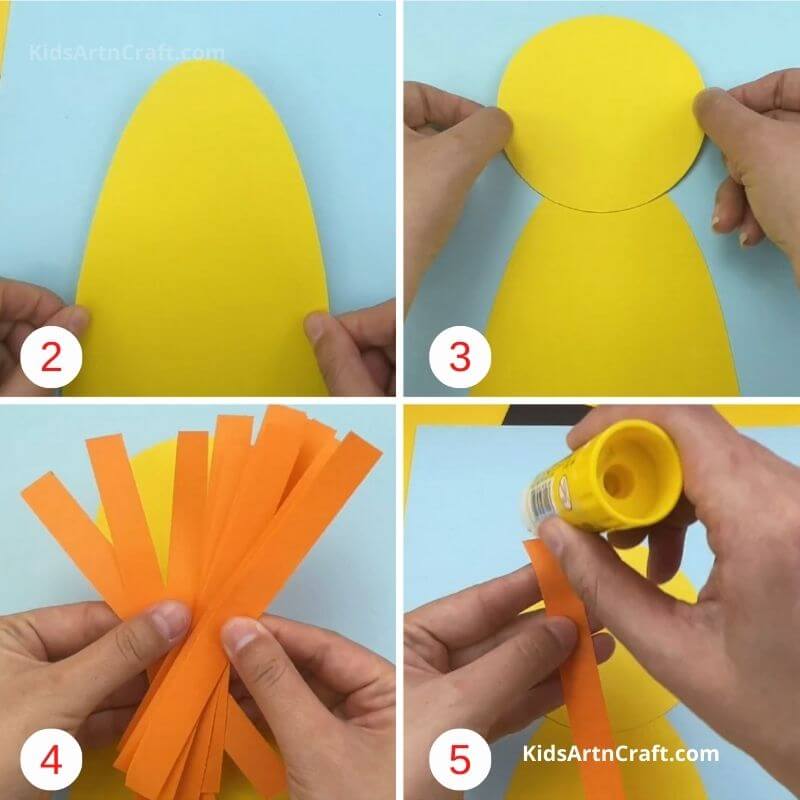
STEP 2 – BODY
Using the yellow paper, draw a long oval-shaped body for the lion. They take a cut-out of the same. Be careful while handling scissors. Now, stick the body on plain paper.
STEP 3 – FACE
Using the same yellow paper, draw a circle for the lion’s face and then cut it out. Gently, stick it on the top of the body.
STEP 4 – STRIPS
Using the orange paper, create about 25 long strips. If you already have strips, that’ll do.
STEP 5 – Stick ends
Apply glue on one end of the orange strip and stick the other end to it. It will look like a fold that is stuck together.
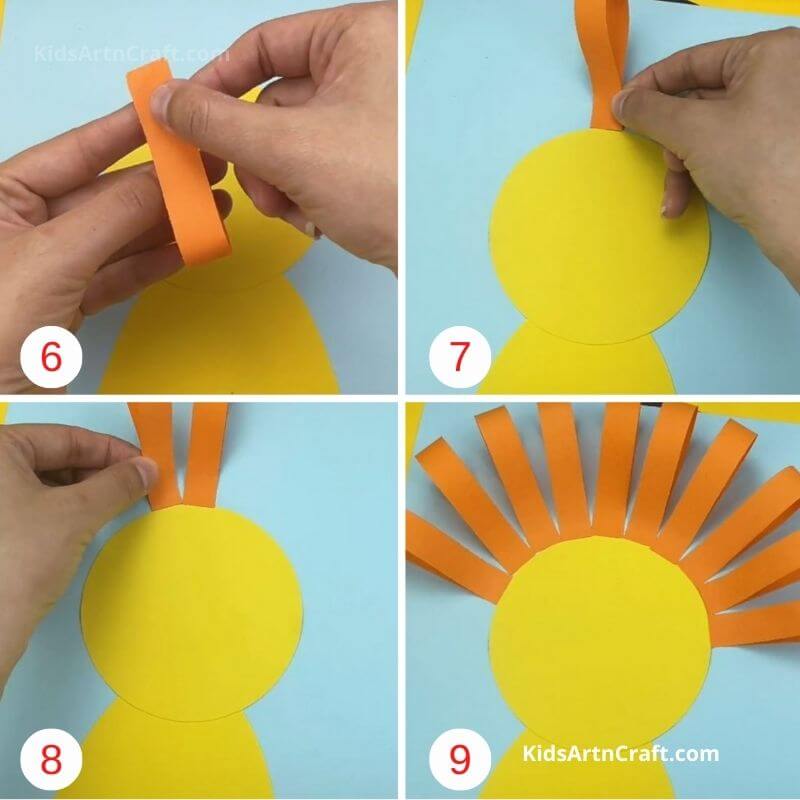
STEP 6 – REPEAT
Repeat step 5 for all the orange strips.
STEP 7 – STICK
Take one side of the orange fold and stick it on top of the head.
STEP 8 – REPEAT
Similarly, do this with another orange fold and stick it next to the previous one.
STEP 9 – HAIR
Just like that, start sticking these orange folds around the face of the lion.

STEP 10 – MAIN BODY
As soon as you’re done sticking all the orange folds around the head, the main structure of the lion will be ready.
STEP 11- EYES
Using the black paper, create two small circles for the eyes. Paint one big and one small circle inside an eye using white paint. This will make the eyes look realistic. Now, stick it on the top of the face, next to each other.
STEP 12 – NOSE
Similarly, create a triangular nose using black paper. You can also draw out the nose on the face directly.
STEP 13 – FACE
Using the black marker, draw the facial features. Draw a straight line down the nose, then draw a smile touching the line. Draw the whiskers or moustache on either side, on the cheeks.
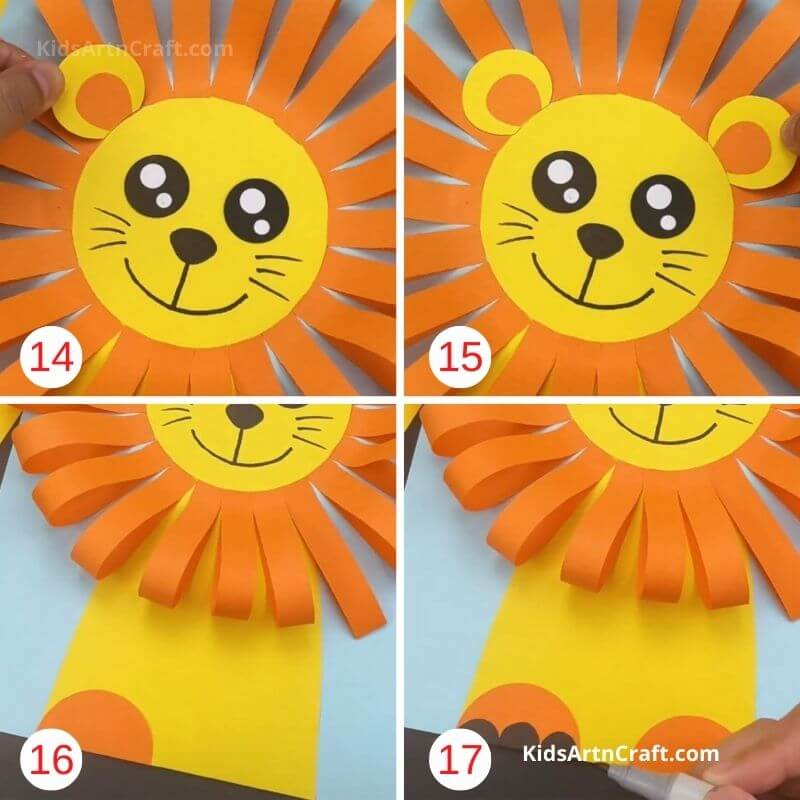
STEP 14 – EAR
Using the yellow sheet, draw and cut out an ear. Now, use the orange paper and make the inner ear. Stick the inner ear to the outer ear. Now, stick the entire ear on the side of the face where the ear would be.
STEP 15 – OTHER EAR
Follow step 14 for the other ear and stick it to the other side.
STEP 16 – FEET
Using the orange sheet, draw and cut out two semicircles for the feet. Stick them at the bottom of the body next to each other.
STEP 17 – TOES
Using the brown sketch pen, draw three tiny semicircles at the bottom of the feet, indicating the toes.
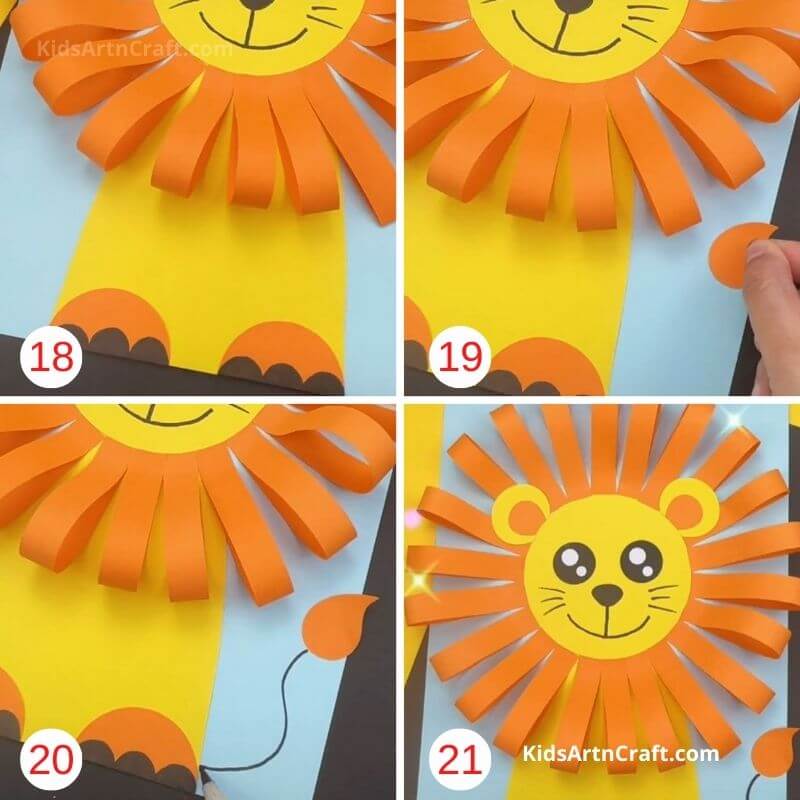
STEP 18 – REPEAT
Repeat step 18 on the other foot. Now the legs are complete.
STEP 19 – TAIL END
Using the orange paper, draw the end of the tail. It’ll look like a waterdrop. Now, cut it out and stick it to the side of the plain paper.
STEP 20 – TAIL BODY
Using the black marker, draw and attach the tail end to the bottom of the body.
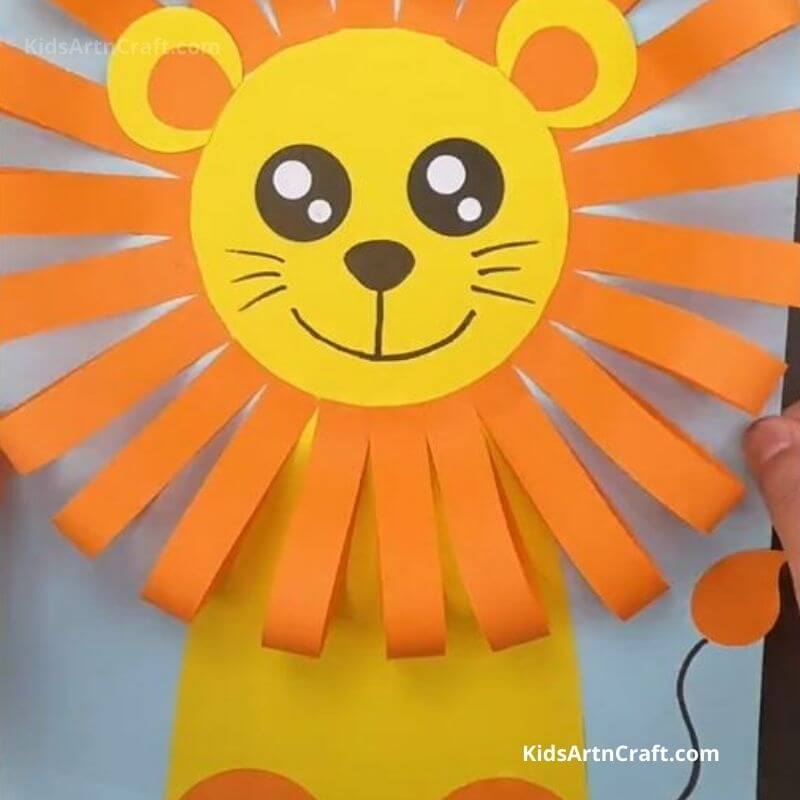
STEP 21 – IT’S READY
Your cute little, majestic paper lion is ready!
Easy DIY Paper Lion Step-by-Step Tutorial for Kids
Learn how to make a cute paper lion craft with this easy step-by-step tutorial for kids and beginners. This DIY paper animal craft uses simple materials like colored paper, scissors, and glue to create a fun lion. Perfect for school projects, kids’ activities, and creative paper craft learning.
Educational Benefits of Making a Paper Lion Craft
Paper lion crafts are more than just fun art activities for children. Simple paper crafting projects help kids improve fine motor skills, hand-eye coordination, focus, creativity, and patience. Cutting paper strips, folding, gluing, and drawing facial details strengthen finger muscles and encourage better control of hand movements.
Animal crafts also help children learn about wildlife in an engaging and interactive way. A lion craft activity can be used by parents and teachers to introduce children to jungle animals, habitats, food chains, and animal characteristics. Creative craft sessions also encourage storytelling, imaginative play, and self-expression.
This easy paper lion craft is ideal for preschoolers, kindergarten students, elementary school kids, classroom activities, homeschooling projects, zoo-themed lessons, and fun weekend crafting sessions at home.
Fun Facts About Lions for Kids
Here are some interesting lion facts children can learn while making this craft:
- Lions are known as the “King of the Jungle.”
- A lion’s roar can be heard from several kilometers away.
- Lions live in groups called prides.
- Female lions are the main hunters in the pride.
- Lions mostly live in grasslands and savannas, not jungles.
- Baby lions are called cubs.
- Lions spend many hours resting and sleeping during the day.
Adding educational facts to craft activities makes learning more exciting and memorable for children.
Tips to Make Your Paper Lion Craft More Creative
You can customize your lion craft in many fun ways:
- Use googly eyes for a playful look.
- Add glitter paper to create a shiny lion mane.
- Make a large jungle background using green craft paper.
- Use paper plates instead of plain paper for the lion’s face.
- Create multiple lions to make a zoo animal display.
- Add cotton, yarn, or tissue paper for textured lion hair.
- Turn the lion into a puppet by attaching a popsicle stick.
These creative ideas help children explore different crafting techniques and improve their imagination skills.
Best Occasions to Make This Lion Craft
This simple lion craft activity is perfect for:
- Zoo animal learning themes
- Jungle-themed classroom decoration
- World Lion Day activities
- Preschool art sessions
- Homeschool animal lessons
- Summer camp craft activities
- Rainy day indoor fun
- Wildlife awareness projects
Fun facts about lions
- A lion’s roar can be heard up to 8 kilometres away.
- Lions are extremely social, so they are the only cats that live in groups.
- Lions can survive a day without water, but they cannot survive without food.
- Female lions are the main hunters.
- Even though lions are called the king of the jungle, they do not live there. They live in the plain grasslands of Africa.
- Lions communicate in 4 ways: roars, growls, moans, and grunts.
- All the lioness raise their cubs together.
- Lions scent-mark their territory, using their wee, to create a border.
- Lions are the only animals that hunt even during a storm.
Why Paper Crafts Are Important for Child Development
Paper crafts are widely used in early childhood education because they support creativity, concentration, and cognitive development. Activities involving folding, cutting, sticking, and coloring help children improve problem-solving skills and develop confidence while creating something with their own hands. Paper crafting is also an affordable and screen-free activity that encourages interactive learning and creative thinking.
This easy paper lion craft is a fun and educational activity for kids of all ages. It helps children explore creativity while learning about animals and improving important developmental skills. With simple craft supplies and easy steps, parents and teachers can create an enjoyable learning experience at home or in the classroom. Try this adorable lion craft with your kids and make crafting time both creative and memorable!
Read More:
- How to Make an Origami Elephant
- How to Make a Paper Birthday Hat – Step-by-Step Instructions
- How to Make a Paper Rabbit – Step-by-Step Instructions
- How to Make a 3D Apple Paper Card – Step-by-Step Instructions
- How to Make Paper Aquarium Fish Step-by-Step Instructions Easy Tutorial


