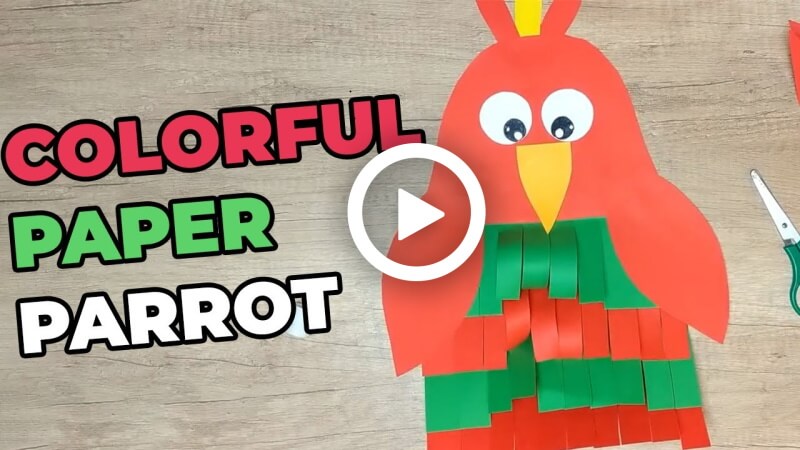


Paper Crafts
How to Make a Cute Paper Parrot

Hello readers! Today you are going to make everybody’s favourite bird. You might be guessing what it might be! So, let’s not blur it ! It’s a parrot. Yes! There must be everyone who loves parrots. I mean who doesn’t? Right! The quirky and talkative nature of these bird’s make us fall in love with them. Everyone wants them as their pet. Kids also love to have a parrot. Today you will learn to make a paper parrot. Amazing right! So, without wasting any time,let’s get started!
How to Make a Cute Paper Parrot
Materials:
- Take two red colours paper of 12*12c.m and 80 gmS.
- Take one green colour paler of 12*12c.m and 80 gmS.
- White colour paper.
- Red colour paper.
- Yellow colour paper.
- A glue stick.
- A pair of eye buttons.
- Scissors
Procedure:
- Take two red colour and one green colour paper of 12*12c.m and 80 gmS.
- Place the two red papers over the green paper by maintaining the edges samely.
- Fold the papers in half together by making a middle fold line.
- Unfold it then follow the middle fold line and cut the pages together.
- There will be four red cut pages and two green pages.
- Take two red paper pieces and two green paper pieces, place the red paper inside the green two pieces.
- Fold the pages together bottom to up like a rectangular shape by creating a middle fold line
- Unfold the papers.
- Cut the bottom of the paper to the middle fold line by making parallel lines vertically. Leave little space between the cut lines.
- Separate all pages.
- Apply glue on the top smooth part of a green cut page then attach the red page smooth part over its top with a glue stick.
- Do the same with the other pieces.
- After the fuzzy piece is ready, apply glue on the top green part vertically with the glue stick.
- Attach a previous cut red colour paper on the area.
- Grab scissors and cut the sides and top of the piece like a bird’s head roundly.
- Take a yellow colour page and cut a triangle shape. It will be the bird’s beak.
- Attach the bird’s beak on the bird’s face.
- Take a white paper, draw to circles of the same size and cut them out with scissors.
- Take two eye buttons and attach them to each paper circle with a glue stick.
- Attach the eyes to the bird’s face with the glue stick.
- Take a red and yellow colour page, cut two red stripes and a yellow rectangular narrow strip.
- Cut the tip of the strips roundly with scissors.
- Attach the strips under the top of the bird’s head with the glue stick.
- Put the yellow stripe between the red stripes.
- Take the previous cut red colour page, fold it in half.
- Cut the page like a bird’s wings by making a drop-like shape.
- Take out the two wings.
- Attach the wings on the sides of the parrot’s body.
- Use the scissors and curve the strings of the parrot’s body.
- Your beautiful parrot will be ready!
P.S- You can use different colour paper as per your help.
How beautiful it is! This bird will shine in your wall. Hang them on your wall or use them to decorate your closet or tables as well. This process does not need many materials, it is very easy to do. Hang them with a yarn on your room’s wall that will look good. You just only have to understand the process. It will make children more concentrated and they will have fun for sure! So hurry up, get your stuff and enjoy your own paper parrot!
Read More:
- How to Make an Origami Elephant
- How to Make An Origami Cat
- How to Make A Colorful Paper Cube
- How to Make A Paper Rabbit
- How to Make A Moving Paper Toy- An Elephant