


Kids Activities
How to Make a Four Season Paper Tree Craft

Let’s make something educational and creative today! What are you going to make? You must be wondering, right? Don’t get confused as the curtains are about to open! Today you’re going to make a paper tree. What is so educational and innovative about it? It’s a normal thing, right? But it is innovative as this tree will take you to the four different seasons. Interesting right! Kids will be fascinated by it. Without teaching kids through books about the seasons, why not make it? Then they can learn with fun. This craft will give immense joy. So, without dalliance, grab your stationery and make an unusual paper tree.
How to Make a Four-Season Paper Tree Craft
Materials:
- Two big white circles of the same size.
- A green colour big circle, the same size as the previous white ones.
- A red colour big circle, the same size as the previous white and green ones.
- A blue colour big circle, the same size as the previous white, green, and red ones.
- A white piece of paper.
- A yellow paper.
- A long, wide, brown, rectangular paper.
- A small brown circle.
- A pencil.
- Colour sketch pens/ markers.
- Black marker pen.
- A glue stick.
- Scissors.
Procedure:
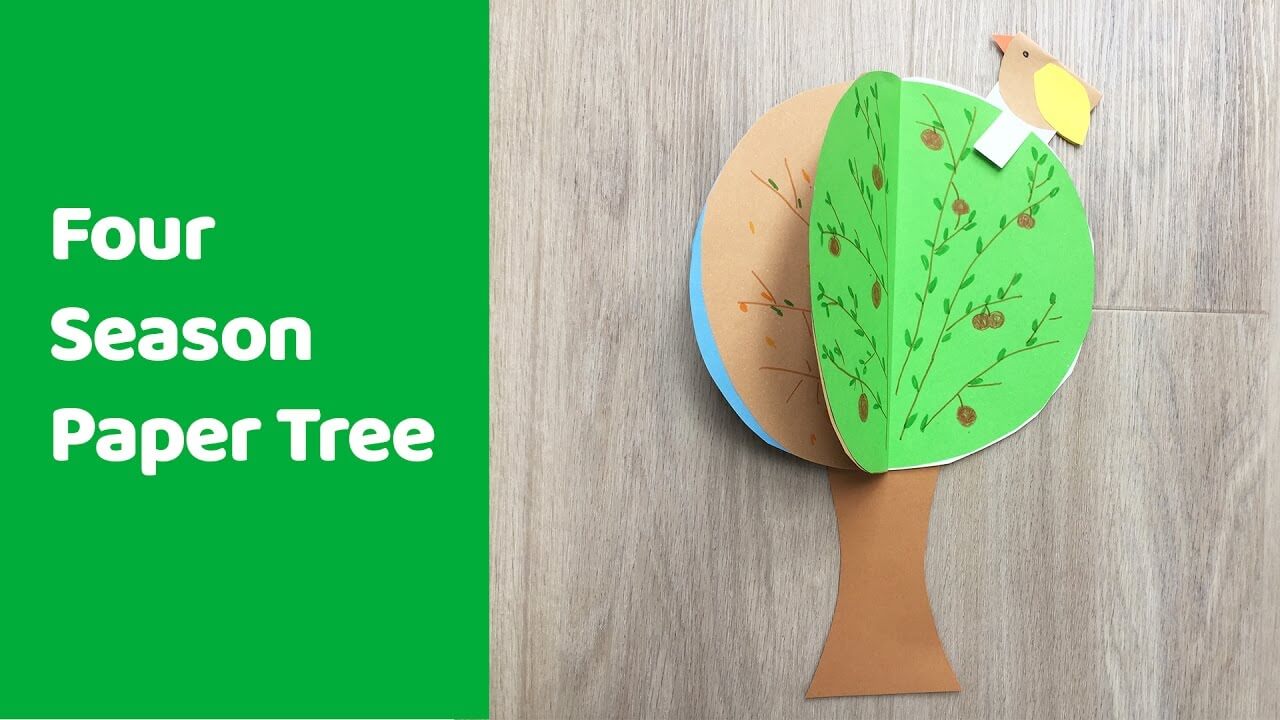
- Take two circles of the same size, and place a circle on the desk.
- Take the other circle and fold it in half from the side by making a middle fold line.
- Attach glue to the folded half circle with a glue stick.
- Paste the half circle’s folded part in the middle of the previous white circle.
- This white area would represent the spring season.
- Take a green colour big circle the same size as the previous white ones, fold the circle in half from side to side.
- Attach glue to the folded half circle with a glue stick.
- Paste the half circle’s folded part over the previous white half-circle.
- The green area would represent the summer season.
- Take a red colour big circle, the same size as the previous white and green ones, fold the circle in half from side to side.
- Attach glue to the folded half circle with a glue stick.
- Paste the half circle’s folded part over the previous green half-circle.
- It will represent the autumn season.
- Take a big blue circle the same size as the previous white, green, and red ones, and fold the circle in half from side to side.
- Attach glue to the folded half circle with a glue stick.
- Paste the half circle’s folded part over the other side of the big white circle.
- It represents the winter season.
- Grab a pencil, colour markers, and a black marker to draw branches, flowers, and fruits according to the season.
- Take a long, wide brown colour strip, draw a tree’s upper stem with a pencil over the page.
- Cut out the drawn part with scissors.
- Attach the stem under the big circle piece you made previously with the glue stick.
- Take a small white rectangle piece of paper, cut it on the bottom side by making two parallel lines, leaving space between the lines.
- Take a small brown circle piece, fold it in half from the side.
- Take a yellow paper, cut out two leaf shapes of the same size with scissors.
- Attach both leaves to both fold sides of the small brown half-circle with the glue stick.
- Attach glue inside part of the folded brown small circle and paste the previous white paper’s non-cut upper side between the inside folds of the piece.
- It will create a clip to stick the tree parts.
- Your beautiful four-season tree will be ready!
P.S-. You can use different coloured papers according to your sense of describing these seasons.
Move the tree’s parts and see the seasons changing in your eyes! It’s amazing, right? Use the small paper clip to attach the parts. Kids will certainly enjoy twiddling with an equivalent. Encourage them to make it as well. Use your creativity to make it more beautiful. They can exhibit this craft in any exhibition also. So, hurry up and get your hands on your own beautiful four-seasons paper tree.
Educational Benefits of the Four-Season Paper Tree Craft
This Four-Season Paper Tree Craft is more than just a fun art activity for kids. It is also a creative learning project that helps children understand how nature changes throughout the year. While making the craft, kids can identify the colors, weather, flowers, fruits, and leaves connected to spring, summer, autumn, and winter.
This activity also supports:
- Fine motor skill development through cutting and folding
- Creativity and imagination
- Seasonal recognition and observation
- Color learning for preschool and kindergarten kids
- Hand-eye coordination and focus
Parents and teachers can use this easy paper craft as a classroom decoration, science activity, or seasonal learning project for children.
Tips to Make Your Four-Seasons Tree Craft More Creative
Want to make your paper season tree look even more beautiful? Try these fun ideas:
- Add cotton balls for snowy winter effects
- Use tissue paper flowers for spring
- Paste tiny paper fruits for summer
- Add orange and yellow paper leaves for autumn
- Decorate with glitter, stickers, or buttons
- Write the season names on each section for learning
Children can also personalize their trees using their favorite colors and decorations.
Why Kids Love Seasonal Crafts
Season-themed crafts are exciting because they connect children with the real world around them. Kids enjoy seeing how trees and the weather change during different times of the year. Interactive crafts like this rotating season tree make learning fun, engaging, and easy to remember.
Hands-on activities also encourage screen-free learning and improve problem-solving skills in young learners.
Best Age Group for This Craft
This easy four-season tree craft is ideal for:
- Preschoolers
- Kindergarten kids
- Grade 1 and Grade 2 students
- Homeschool learning activities
- Classroom art projects
Younger children may need help with cutting and folding, while older kids can decorate the tree independently.
FAQ’s on Four-Season Paper Tree Craft
Q1. What materials do I need for the Four-Season Paper Tree Craft?
Answer: You will need four sheets of colored construction paper (one for each season), scissors, glue, and a pencil.
Q2. What size paper should I use for this craft?
Answer: Any size paper will work, but it is recommended to use construction paper that is 8.5” x 11”.
Q3. How do I make the tree shape?
Answer: Start by drawing a tree outline onto one of the sheets of paper. Cut out the tree shape, then trace it onto the other three sheets of paper.
Q4. How do I assemble the tree?
Answer: Glue the four tree shapes together. The four tree shapes should be layered in the order of spring, summer, fall, and winter.
Q5. How do I add details to the tree?
Answer: Cut out shapes from the remaining three sheets of paper to make leaves, flowers, snowflakes, and other details for your tree. Glue them onto the tree in the appropriate season.
Q6. Can I use other materials for this craft?
Answer: Yes! You can use other materials such as markers, colored pencils, glitter, and buttons to make the tree more unique.
Q7. What can I do with the finished tree?
Answer: You can hang the tree in your home for decoration, or give it to someone as a gift.
Q8. What other crafts can I make with construction paper?
Answer: You can make a variety of crafts with construction paper, such as paper wreaths, paper flowers, paper airplanes, and more.
Q9. How long will it take to make the Four Season Paper Tree Craft?
Answer: Depending on your level of skill and the details you add, it should take around 30 minutes to an hour.
Q10. Can I make this craft with my children?
Answer: Yes! This craft is great for children of all ages. It is a fun and creative way to teach them about the seasons.
The Four Season Paper Tree Craft is a simple and educational DIY activity for kids that combines creativity with learning. It helps children explore the beauty of spring, summer, autumn, and winter in a fun, hands-on way. Whether you are a parent, teacher, or homeschool educator, this colorful paper craft is a wonderful seasonal activity to try with children. Gather your craft supplies and enjoy making your own beautiful four-season tree today! 🌳✨
Keep kids entertained and inspired with amazing DIY crafts and educational activities! Join our Telegram community and follow us on YouTube & Facebook.
Reviewed By Rachit Gupta
Read More:
- How to Decorate a Party with Paper Crafts
- How to Make an Explosion Box – DIY Paper Crafts
- Christmas Paper Crafts for Kids to Make
- How to Decorate a Party with Paper Crafts
- How to Make Paper Craft Turkey for Thanksgiving: Step-by-Step Instructions, Easy Tutorial


