DIY and Crafts
How to Make DIY Paper Frog with Moving Tongue


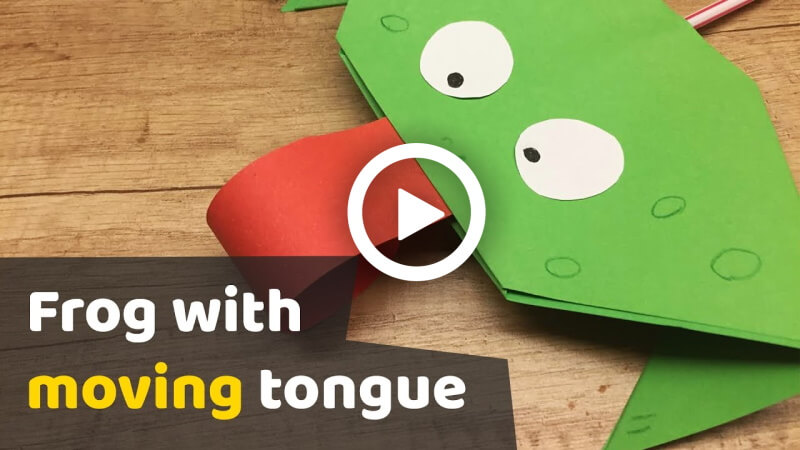
Hello readers! Today you are going to make a very fun craft that will bring a smile to all of your face. You might be guessing what it might be, so without any words, let’s reveal! The craft you’re going to learn is to make a paper frog with a moving tongue. It will be so fun to see a frog with a moving tongue, right!! Long tongues are the best and most interesting feature of the frogs. So, it will be very fun to create a paper frog with it. So, without wasting any time, let’s get started!
How to Make a DIY Paper Frog with a Moving Tongue
Materials:
- Two green colour papers of any size.
- An orange-colored paper wide strip.
- A long plastic straw.
- White page of any size.
- A glue stick.
- A pencil.
- Colour sketch pens.
- Black marker.
Procedure:
Reference video:
- Take a green coloured paper, fold it in half from the corners to make a triangle shape.
- Take another green colour page and fold similarly. The size of the two triangles should be the same.
- Fold the top corner of the triangles like making a converse triangle.
- Take a triangle piece and place it like a converse triangle, then take an orange colour paper wide strip, attach the orange colour strips to the triangle’s fold area with a glue stick.
- Apply glue on the top side of the triangle base and over the orange strip as well.
- Grab a long straw and attach it to the orange area. It must be situated a little in the orange shape, and the other areas must be out over the triangle.
- Take the other triangle shape, and place it similarly over this triangle.
- Push it with your hand to properly attach it.
- Turn over the frog and fold the two edges of it by making arrow-like shapes.
- Again, turn over the frog.
- Take a white page and draw two circles on it with a pencil.
- Grab a black marker and add cute round eyeballs on the circles.
- Cut out the circles with scissors.
- Take the round eyes to apply glue on them with the glue stick and attach them to the frog’s face.
- Grab a pencil and make two nose holes in the frog’s face and circles all over it. You can also use a black marker pen other than a pencil.
- Roll the orange strip roundly with the pencil.
- Release the pencil from the strip.
- Blow the straw, then see the magic.
- Your tongue-moving frog will be ready!
Look at the tongue! All you need to do is just blow air into the straw. Kids will love playing with it. The making process is also easy and requires fewer materials, so you can easily make it. Encourage your kids to make this fun toy in their free time. They will adore it. Be more creative and use your sense of creativity to decorate the frog. So, hurry up! Grab your stationery and let’s make a quirky tongue-moving frog!
FAQs on How to Make a DIY Paper Frog with a Moving Tongue
Q1. What materials do I need to make a DIY paper frog with a moving tongue?
Answer: You will need paper, scissors, glue, tape, and two straws or two popsicle sticks.
Q2. How do I cut out the paper frog?
Answer: Print out a template of the frog or draw your own. Cut out the template with scissors and use it to trace the shape onto your paper. Cut out the paper frog shape.
Q3. How do I make the frog’s legs?
Answer: Fold the paper in half and cut out two legs. Glue the legs to the body of the frog.
Q4. How do I attach the straws to the frog?
Answer: Make two small holes in the frog’s head and glue one end of each straw into the holes.
Q5. How do I make the frog’s tongue?
Answer: Cut out a tongue shape from paper and attach it to the end of one of the straws with tape or glue.
Q6. How do I make the frog’s eyes?
Answer: Draw two small circles on the frog’s head and color them in with a black marker or crayon.
Q7. How do I make the frog’s mouth?
Answer: Draw two curved lines on the frog’s head and color them in with a black marker or crayon.
Q8. How do I make the frog’s body?
Answer: Draw two curved lines on the frog’s body and color them in with a black marker or crayon.
Q9. How do I make the frog’s tongue move?
Answer: Attach the other end of the straw to the frog’s head with tape or glue. Blow into the straw to move the tongue.
Q10. How do I make the frog’s legs move?
Answer: Glue two popsicle sticks to the frog’s legs and move them to make the frog’s legs move.
This DIY paper frog with a moving tongue is a simple and entertaining craft activity for kids that combines creativity with interactive play. With just a few basic craft supplies, children can create a cute frog toy while learning paper-folding and crafting skills. Try different colors, decorations, and frog expressions to make your craft unique and even more fun.
Bring creativity to life with amazing crafts, easy DIYs, and fun kids’ learning activities. Join our Telegram and stay inspired on YouTube & Facebook
Read More:
- How to Make An Elephant – Moving Paper Toy
- How to Make An Origami Fish
- How to Make An Origami Paper Panda
- DIY Art with Paper Circles – Craft Ideas for Kids
- How to Make An Antistress Transformer Paper Toy