


Paper Crafts
Easy Paper Craft Ideas for Kids

Try these easy crafts, and you will love them. You will enjoy making these and teaching your kids as well. Below are the steps given to make these amazing crafts. You can decorate these in your house, and they are super attractive.
Why Paper Craft Activities Are Important for Kids
Paper craft activities are a wonderful way to encourage creativity, imagination, and hands-on learning in children. Simple paper crafts help kids improve fine motor skills, focus, patience, and hand-eye coordination while having fun. These DIY craft ideas also support early learning by teaching shapes, colors, patterns, and problem-solving skills through creative play. Easy paper craft projects are ideal for preschoolers, kindergarten students, and elementary school children because they use affordable materials and are easy to make at home or in classrooms.
Easy Paper Craft Ideas for Kids
Materials required:
- A4 sheets
- Glue
- Scissor
- Marker/ pen
- Stick
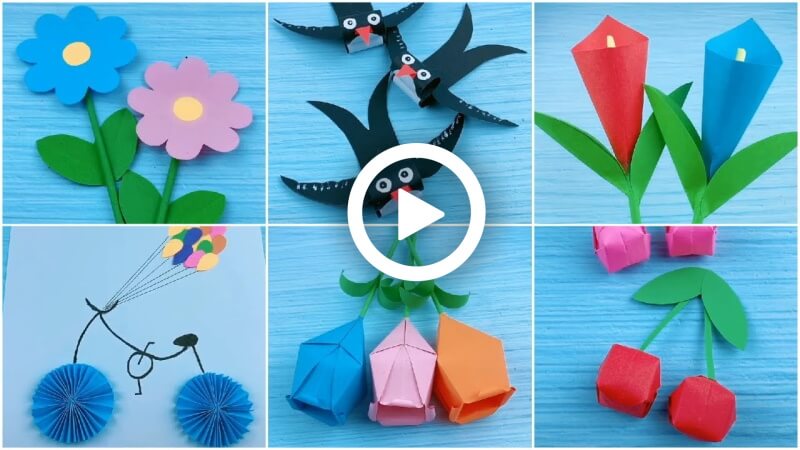
Craft 1: Penguin
Procedure:
- Take a black piece of paper and, with the help of the scissors, cut out a rectangular shape, and at the bottom, cut 2 wing-shaped legs as shown.
- Now take a white paper and cut out a rectangular shape, and curve the top and bottom parts as in the video.
- Take it and paste it on the black paper.
- Now roll the top part of the paper and paste it.
- Take a black rectangular-shaped paper, roll it, and paste it.
- Now take a white rectangular paper having curves at the top and the bottom and paste it on the black rolled paper.
- Paste that rolled paper on the black paper as shown.
- Now take an orange paper and cut out a triangle shape for the beak and paste it on the rolled paper.
- Take a white paper and cut out 2 small circles and paste them on the rolled paper, and with the help of the marker, draw the eyes.
- Take a black piece of paper, fold it in half, draw as shown, and cut it out.
- Now paste the wings on the paper.
Craft 2: Calla lily
Procedure:
- Take a square-shaped piece of paper, fold it, make a cone as shown in the video, paste it, and cut a little bit at the bottom.
- Now, take a green color sheet and roll it up, and paste the end.
- Take a cream-colored strip and roll it up on the green rolled-up paper.
- Now put it inside the cone-shaped flower.
- Take a rectangular piece of green paper and fold it in half. Now, again fold it in half and draw as shown.
- Take the scissors and cut the shape out.
- Now, take both the leaf-shaped papers and paste them on the rolled stick.
Craft 3: Stork bird
Procedure:
- Take a white A4 sheet and cut out 3 circles.
- Now fold the circles in half and paste them one above the other as shown on the paper.
- Take a black A4 sheet and cut out 3 small circles.
- Now fold all the black circles in half and paste them between the white folded circles as in the video.
- Take an orange paper and cut out a thin strip and a semicircle shape at the bottom of the strip with the help of the scissors.
- Now paste it below the white folded circle.
- Take a white paper, cut out a strip, and paste it on the paper as shown.
- Now cut out a semicircle and paste it on the top of the strip.
- Take the orange paper and cut out a triangle shape for the beak and paste it on the side of the semicircle.
- Now take a paper and cut out an eye and paste it on the semicircle.
Craft 4: Flower
Procedure:
- Take a square piece of paper and fold it in half 2 times, then fold it again and make a right-angle triangle.
- Now open it and fold it as shown in the video; it will look like a triangular shape.
- Take the pencil and draw a curve at the top, and cut it out with the help of the scissors.
- Now take another paper and cut out a small circle and paste it in the middle of the flower.
- Take a green colored paper and roll it up, and put glue at the end and paste it on the backside of the flower… Take a green paper again and fold it in half 2 times and, cut out 2 leaves, and paste them on the rolled paper.
Craft 5: bicycle with balloons
Procedure:
- Take a rectangular piece of paper and fold it as shown in the video; you will see it looks like a paper fan.
- Now take the paper and cut it out from the middle.
- Take the half piece and fold it in half, and paste the sides.
- Now take the bottom sides and paste them together as before.
- Take the glue and put some in the middle, and paste it.
- Take the other half and do the same as before.
- Now take both the circles and paste them on the paper.
- Take a few colorful papers and cut out balloon shapes, and paste them together on the paper.
- Now take a pen and a marker and draw as shown in the video.
Craft 6: Flower
Procedure:
- Take a square piece of paper and fold it in half 2 times, then fold it again and make a right-angle triangle.
- Now open it and fold it as shown, and it will look like a diamond shape.
- From both sides, fold it as in the video.
- Now, from the top, take both sides and fold them inward.
- From the back, do the same as before, now from the bottom, fold it.
- Fold all the bottom sides as shown.
- Take a stick and curve the folded sides.
- Now, with your fingers open up the inside of the flower, take the scissors and cut the bottom.
- Take a green piece of paper, roll it up, and put glue at the end.
- Now put that stick into the flower.
- Take a green sheet, cut out 2 leaves, and paste them on the stick.
Craft 7: Tulip
Procedure:
- Take a square piece of paper and fold it in half 2 times, then fold it again, and it will look like a triangle.
- Now fold both sides of the triangle-shaped paper in, then again fold the edges a little on both sides.
- From the top fold a little and put the top parts inside the folded edges.
- Repeat the same procedure as before with all the sides.
- Now blow some air from the bottom side.
- Take a green paper and cut out a strip and put it in the flower. Cut out a leaf and paste it on the strip.
Craft 8: Lotus
Procedure:
- Take a square piece of paper and fold it in half 2 times, then fold it again, and it will look like a triangle.
- Now fold both sides of the triangle-shaped paper in; do the same with the other side as well.
- It will look like a diamond shape. Now, take both sides and fold them inside one another.
- Do the same with the other side as well.
- Now blow some air from the bottom, then open the petals from each side.
- Take a green piece of paper, roll it up, and put glue at the end.
- Now put that stick into the flower.
- Take a green sheet, cut out 2 leaves, and paste them on the stick.
All crafts are ready. You can try these with your kids, and they are very simple to make. You will need very little time to make these, and you will enjoy making them as well. So, do give these a try and have fun making these.
Materials Commonly Used in Easy Paper Crafts
Most paper craft activities can be created using basic supplies available at home or school, such as:
- Colored paper or construction paper
- Glue stick or craft glue
- Child-safe scissors
- Crayons, sketch pens, or markers
- Popsicle sticks
- Googly eyes
- Glitter sheets and stickers
- Cardboard or chart paper
Using simple and budget-friendly materials makes paper crafting accessible and enjoyable for all age groups.
Educational Benefits of Easy Paper Crafts
Paper craft activities offer many developmental benefits for children:
- Strengthen finger muscles and motor skills
- Improve concentration and creativity
- Encourage independent thinking and imagination
- Build confidence through hands-on achievements
- Help children learn shapes, colors, and patterns
- Support sensory development and coordination
Creative activities also encourage meaningful parent-child interaction and collaborative classroom learning experiences.
Fun Tips To Make Paper Crafts More Creative
Here are some simple ways to make your paper craft ideas look even more exciting:
- Add layered paper pieces for a 3D effect
- Use textured or glitter paper for decoration
- Create colorful backgrounds and borders
- Attach movable parts using paper fasteners
- Turn crafts into puppets, greeting cards, or wall decorations
- Use recycled materials for eco-friendly crafting
These creative additions make craft projects more interactive and visually appealing for kids.
Best Occasions for Paper Craft Activities
Easy paper crafts are perfect for:
- School craft competitions
- Classroom activities
- Summer camp projects
- Rainy day indoor fun
- Birthday party activities
- Holiday and festival decorations
- Weekend DIY sessions with parents
Paper crafts are versatile and can be adapted for almost every season, celebration, or educational theme.
Safety Tips for Kids During Craft Time
To ensure safe crafting sessions:
- Always supervise young children while using scissors.
- Use non-toxic glue and child-friendly materials.
- Keep the workspace clean and organized.
- Avoid sharp or heavy decorative items for toddlers.
- Encourage proper cleanup after crafting.
Safe crafting habits help children enjoy art activities confidently and responsibly.
FAQ’s on Easy Paper Craft Ideas for Kids
Q1. What supplies do I need to get started with paper crafting?
Answer: You will need paper, scissors, glue or tape, and markers or crayons.
Q2. What types of paper can I use for crafts?
Answer: You can use any type of paper for paper crafting. Cardstock and construction paper are the most common choices, but you can also use tissue paper, newspaper, wrapping paper, or even old magazines.
Q3. How do I make a paper airplane?
Answer: Start by folding a square piece of paper in half diagonally to make a triangle. Next, fold the top two corners towards the center. Unfold the triangle, then fold the top corner to the center again. Then fold the top edge of the triangle down to the bottom edge. Finally, fold the wings down, and your paper airplane is ready to fly!
Q4. How do I make a paper flower?
Answer: Start by cutting a circle out of construction paper. Cut the circle into a spiral shape, leaving the center intact. Then roll the spiral up from the outside to the center. Glue the center of the flower together and add a stem if desired.
Q5. How can I make a paper lantern?
Answer: Start by cutting a rectangle out of construction paper. Fold the rectangle in half and make two small cuts on each side. Open the paper and fold each side in towards the center. Then use tape or glue to attach the sides. Finally, attach a string to the top of the lantern for hanging.
Q6. How do I make a paper basket?
Answer: Start by cutting two strips of paper. Then fold the two strips together to look like an accordion. Secure the strips together with glue or tape. Then, cut a rectangle shape out of cardstock and fold it in half. Glue the accordion strips to the sides of the rectangle shape and allow them to dry before using.
Q7. How do I make a paper hat?
Answer: Start by cutting a strip of paper that is twice as long as the circumference of the head. Then fold the strip into an accordion shape. Glue the ends together to form a circle. Next, fold the circle in half and secure the two sides together with glue or tape. Finally, fold the top of the hat down to form a brim.
Q8. How do I make a paper bag?
Answer: Start by cutting a rectangle out of construction paper. Fold the rectangle in half and make a small cut on each side of the fold. Open the paper and fold the sides in towards the center. Then use tape or glue to attach the sides
Easy paper craft ideas are a fantastic way to combine learning and creativity for kids of all ages. These simple DIY activities help children explore imagination, improve important developmental skills, and enjoy screen-free fun at home or school. Whether making animals, flowers, cards, or decorative projects, paper crafts provide endless opportunities for creative expression and educational play. Try different designs, colors, and recycled materials to make every craft project unique and exciting!
Let kids create, learn, and enjoy with fun DIY crafts and exciting activities! Join our Telegram community today.
Reviewed By Jatin
Read More:
- 20 Butterfly Craft Ideas for Kids – Paper Crafts, Drawings & More
- 30+ Step-by-Step Paper Crafts Ideas for Kids
- Classroom Decor Paper Craft Ideas for Kids
- Creative Paper Craft Ideas for Kids
- Crumpled Paper Crafts for Kids
- Cute 3D Paper Craft Ideas for Kids


