

Drawing
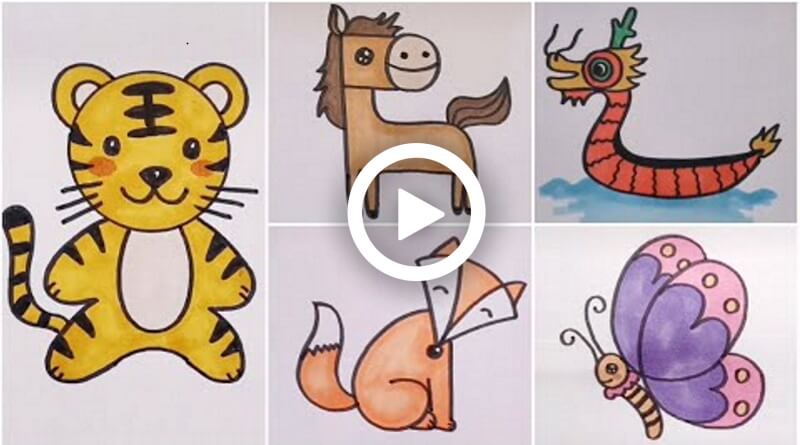
How to Draw Animals – Easy to Learn Tutorial

These are a few easy and attractive animals and birds drawings you must help your kids with. Here are the steps you must follow for drawing these amazing and simple drawings. Your kids will enjoy drawing these and have fun while drawing. So try and guide your kids in making these easy drawings.
How to Draw Animals
Materials required:
- Marker
- Paper
- Sketch pens
Steps:
- Draw a reverse S and at the end curve it a bit and extend the line.
- Now at the top of the S draw a few circles one inside the other.
- Then from the side of the circle draw a line and a few zigzag patterns and a line at the end.
- Now at the top of it draw a pattern as shown.
- Then on the other side of the circle draw a line and curve it inside and from that again draw a line and curve it and merge it with the existing line.
- Now at the bottom of it draw a zigzag pattern and 2 curvy lines as shown.
- Then as the previous reverse S has drawn draw the same curvy line and merge it at the end.
- Now at the end and on the body draw the patterns as shown.
Drawing 2: Donkey
Materials required:
- Marker
- Paper
- Sketch pens
Steps:
- Draw an F and then from the front draw a circle and a curve inside the circle.
- Then draw 2 dots above the curve and inside the F draw a circle as an eye.
- Now at the top of the F draw a petal shape as an ear and a line inside it.
- Then from that draw a curvy line and a zigzag pattern from both the sides of the ear.
- Now from the below of the F draw a curvy line as shown.
- Then from the line of F draw 2 thin U shapes and a horizontal line and then again an U and merge it with the curvy line and draw a curve at the inner side of it.
- Now at the backside of the curvy line draw 2 curvy lines as tail and merge them and inside that draw again 2 lines.
Drawing 3: Butterfly
Materials required:
- Marker
- Paper
- Sketch pens
Steps:
- Draw a 6 by curving the top line and extending the last line and curving it as shown.
- Now at the backside of it draw a circle and below that draw a wavy structure.
- Then from that draw 2 curvy lines and a curve at the bottom.
- Now inside the circle draw a small circle and a small line below that.
- Then at the top of the circle draw 2 lines and curve them opposite to each other as antenna’s.
- Now draw the designs as shown in the video.
Drawing 4: Cat
Materials required:
- Marker
- Paper
- Sketch pens
Steps:
- Take a coin and make a circle leaving a few spaces at the top as shown in the video.
- Now draw 2 lines from both the spaces left and narrow them.
- Then from the top of the narrow point draw a curve and inside that draw 3 lines, do the same with another side as well.
- Now inside the circle draw 2 circles and 2 dots inside that.
- Then below the 2 circles draw a reverse triangle and from the tip draw a diamond shape and a curve inside it.
- Now draw 3 lines on each side of the circle.
- Then below the circle draw 2 curve lines from each side and then draw a semi ovals at the bottom of each line.
- Now Draw 2 straight lines and merge them with the semi ovals and draw a curve in between both the lines.
- Then draw 2 curvy lines from each side and draw a semi oval at the end of both.
- Now from one side draw 2 curvy lines as tail and draw lines inside it.
Drawing 5: Fox
Materials required:
- Marker
- Paper
- Sketch pens
Steps:
- Draw a V and then a 6 from one side and 1 from the other side.
- Now make a curve at the top of the V and then draw 2 triangles at the top and extend the lines to the bottom of the V shape.
- Then at the bottom of the V draw a circle and inside the V draw 2 curves.
- Now at the bottom of the 6 draw a curve and draw 2 lines inside it.
- Then outside the 6 draw, a line and from the end of the 1 draw a curve and draw 2 lines.
- Now at the backside of 6 draw 2 curvy lines and merge them at the end and draw a zigzag pattern inside it.
Drawing 6: Tiger
Materials required:
- Marker
- Paper
- Sketch pens
Steps:
- Take a coin and draw a circle and inside it draw a tilted 3.
- Now below the circle draw a reverse 3 on one side and a normal 3 on the other side.
- Then at the top of the circle draw 2 semi circles on each side and inside that draw again 2 small semi circles.
- Now inside the circle draw, 2 oval shapes as eyes and above the tilted 3 draws a V and a curve at the top.
- Then with the marker draw the designs as shown and draw 3 lines on each side of the circle.
- Now below the circle draw a U shape and on the backside of the reverse 3 draw 2 curvy lines as a tail.
- Then with the marker draw the designs as shown in the video.
Drawing 7: Mouse
Materials required:
- Marker
- Paper
- Sketch pens
Steps:
- Draw an oval shape and then again draw an oval shape inside it.
- Now draw 2-2 lines and zigzag lines at the bottom of the line on each side of the oval.
- Then inside the oval draw 2 circles and dots inside them.
- Now below the circles draw a triangle and below it draws a semi oval and draws a few lines inside it.
- Then draw 3 lines on each side of the oval.
- Now outside the oval and below the 3 lines draw a curve on both the sides and 2 small curves at the end of it.
- Then at the bottom of the oval draw 3, thin U shapes on each side, and on the inside oval draw 3 reverse hearts.
Drawing 8: Bird
Materials required:
- Marker
- Paper
- Sketch pens
Steps:
- Draw a heart shape without merging at the end and then draw a tilted 3 at the bottom.
- Now from the top draw a 3 extending the top line and merging the end line on the heart shape.
- Then at the bottom of the tilted 3 draws a reverse heart and draw a circle inside the 3.
- Now at the backside of the 3 draw a triangle and a line in between.
- Then at the top of the 3 draw a curve and a line and merge them.
- Now draw a horizontal line at the bottom from the tilted 3 and 2 lines from 3 and again 2 lines each from that line.
Your 8 amazing drawings are ready. Your kid will have a great time in making these and they will surely love the end result of it. Do give these drawings a try and help your kids in enhancing their skills.
Read More:
- Cute Parrot Couple Drawing Step by Step Tutorial
- Drawing Ideas for Kids to Enhance Their Skills
- Easy Animal Drawing for Kids – Step By Step Tutorials
- Easy Animal Drawings for Kids To Enlighten Your Budding Artist
- Easy Chalk Drawing on Board – Beginner Chalk Drawing For Children